 'Twas the Engineer's birthday this past weekend and we had his family over for brunch. Yee-haw, what a spread! Never was there a more perfect union of breakfast and lunch, or a better brunch been brunched. As we all sat there patting our stomachs and dabbing butter from our chins, the Engineer said, "We should really do this more often! No, really!" There was a little bit of something for everyone: the Engineer crafted gigantic omelets with cheese and ham and onions and peppers (from my garden, in fact!); we bought the "fancy" (read: slightly more expensive) bacon; the Mother of the Engineer arrived hidden behind a bowl of cut fruit that was half the size of our dining room table; the Father of the Engineer produced lox and cream cheese like a magician; tea and cider and organic pomegranate juice were drunk with reckless abandon. And what, you ask, was my contribution to this Brunch Debauchery? Well, one can't exactly have lox and cream cheese without bagels, now can one?
Bagels are one of those mythical bread products that home cooks speak about in hushed voices and with much incredulous shaking of the head. Well, the biggest mystery seems to surround this whole issue of boiling. To boil or not to boil? How long? Why boil in the first place? WTF?!
 The secret to baking a good, chewy bagel is actually a combination of boiling the bagels very briefly and then baking until golden brown on the outside. Bagels should be boiled for a total of at least 20 seconds and certainly no more than 30 seconds. This is just long enough to cook the outside layer of dough, which kills the yeast on the surface (making a tight, chewy skin), caramelizes the outside starches, and gives the bagel its nice shine. Boiling the bagel for any longer just makes the skin thicker and and more inelastic, and gives you a final product as dense as a hockey puck. You want some elasticity in the skin so the bagel can still rise a bit in the oven and so that the bagel is still...well...edible.
One other essential step to making good bagels is a retarded rise (a long, slow rise at a low temperature) overnight in the refrigerator. This improves the overall taste of the bagels and the structure of the interior crumb. (For more info on the how and why of retarded rises, click HERE.) Using high-gluten flour will also help improve the internal structure and chew. It's great if you have access to it, but for the home-baker, all-purpose flour works just as well.
It takes some planning and some trial 'n error, but making good quality bagels at home is not nearly as mysterious or as impossible as rumor would have you believe. For those of you out there saying, "Bake bagels, who me? Naw, I couldn't!" Oh, pshaw, y'all! Read on:
Bagels
from Breads from the La Brea Bakery by Nancy Silverton
Makes about 18 bagels
12 oz (~1 1/2 c.) water
2 tsp yeast
13 1/2 oz (~1 1/2 c) sourdough starter*
2 lbs (~6 1/2 c) all-purpose flour
2 oz (~1/4 c) sugar
1 tbsp sea salt
2 tbsp barley malt syrup**
6 tbsp milk powder
*If you don't have SD starter, substitute 6.5 oz water and 6.5 oz flour. You shouldn't notice anything too different in the final flavor or texture--I'm just a SD fiend, so I throw it in everything!
**It took me a while to find barley malt syrup--try Whole Foods, Wild Oats, or another natural food store. (Trader Joe's does NOT carry it.) It's not 100% essential to the quality or the baking of the bagel, but does enhance the flavor.
Making the Dough
(note: bagel dough is very dense and stiff, so it's easiest to mix it in an electric stand mixer, at least for the initial mixing of the ingredients. Keep a close eye on your mixer, though, to be sure it's not straining too hard to mix the dough and wearing on the engine. Also completely fine to mix by hand.)
Step 1: Pour water into a bowl and add yeast. Allow yeast to dissolve and ferment for about three minutes, and then mix in the sourdough starter. Add sugar, salt, malt syrup, and milk powder, and stir to combine.
Step 2: Add in flour one cup at a time. This is one bread where you actually want to add as much flour as you can. Having said that, keep an eye on the dough--you don't want it to get too dry. The dough should be moist and slightly tacky too the touch, but shouldn't stick at all to your hands or the counter. The dough will be very stiff and dense. The recipe calls for 6.5 cups, but I usually end up adding about 5.5 cups.
Step 3: Turn the dough onto a floured counter-top and knead the dough for 15-20 minutes until all the flour (or as much as you can get into it) is incorporated and the the dough springs back when you press your finger into it. As the dough is so stiff and difficult to knead (dang, those arms get tired!), I recommend doing the kneading in two shifts of 10 minutes, letting it rest for about 5 minutes in between shifts.
Step 4: Cover the dough with plastic wrap and allow to rest for 10 minutes.
 Shaping the Bagels
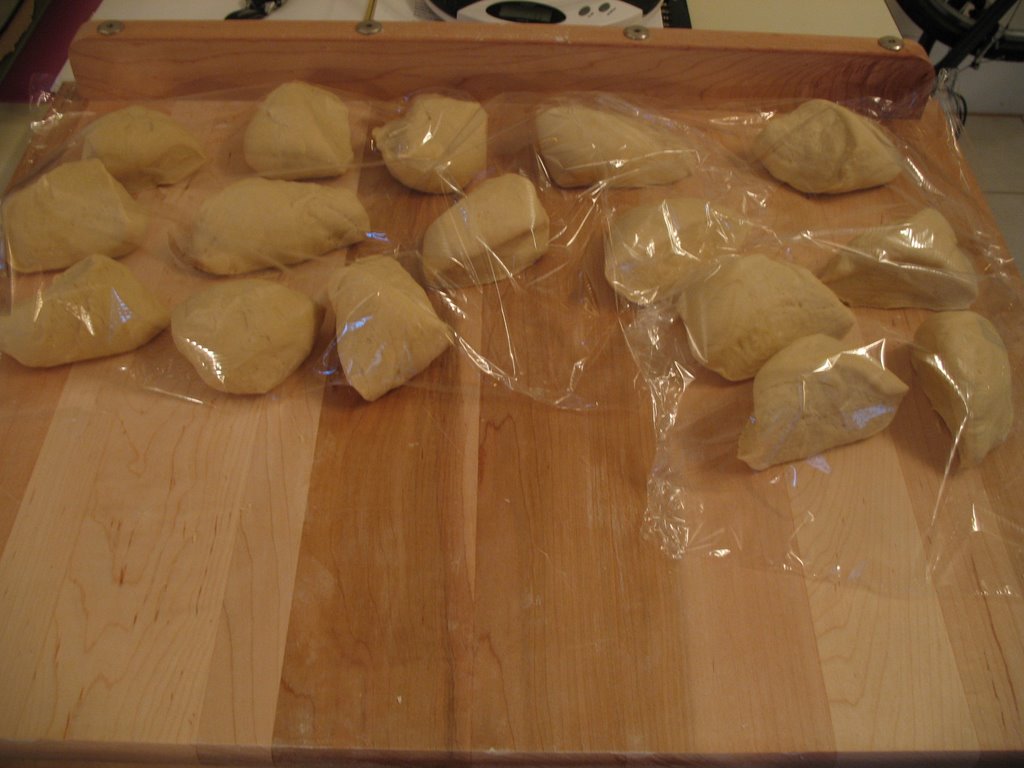
Step 5: Cut the dough into 18 pieces (about 4 ounces each). Cover with plastic wrap and allow to rest for 15 minutes. (These "rests" give the gluten time to relax and make it easier to shape the bagels. Without resting, the dough would tend to tighten up and spring back from whatever shape you give it.)
 Step 6: Working one piece of dough at a time, shape the dough into a rope 6-8 inches long by gently rolling the dough between the palm of your hand and the counter top. As it forms into a rope, use two palms to continue lengthening.
Step 7: Take one end of the dough rope between your thumb and forefinger.
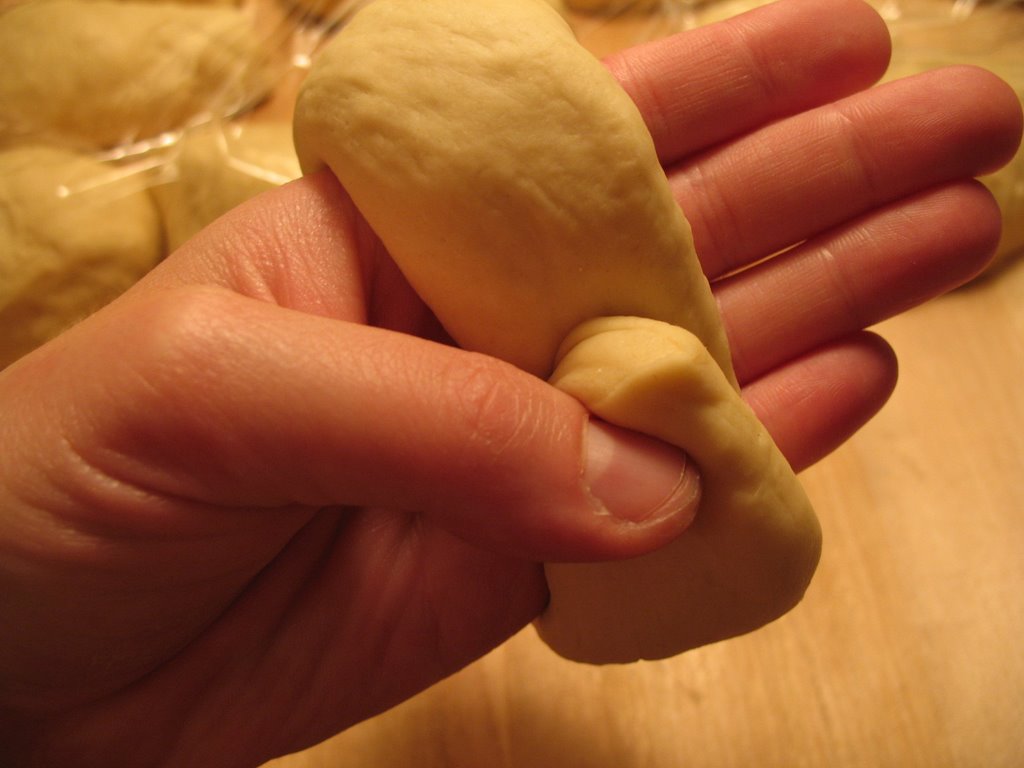 Wrap the dough around the back of your hand and overlap the two ends by about an inch or so. With the overlapped ends at the center of your palm, seal the ends by rolling the rope back and forth against the counter top
 . If the ends keep unsticking, use a dab of water to 'glue' them together.
Step 8: Stretch the finished bagel a bit to make the hole bigger and then place it on a parchment-lined baking sheet. Repeat Step 6 and Step 7 with the rest of the dough, spacing the bagels about two inches apart on the baking sheet. Cover with plastic wrap and refrigerate for 12 -24 hours (this is the 'retarding' step).

Boiling and Baking the Bagels
Step 9: About an hour before baking time, pre-heat the oven to 450 degrees. About a half an hour before baking time, set a large stockpot filled with at least 4 inches of water to boil. Just before the water begins to boil (about 5 minutes before bake time), take the first sheet of bagels out of the fridge (leave any other sheets in the fridge).
Note: All you want to do here is take the chill off the bagels. Do NOT let the bagels come completely to room temperature or they will 1) stick to the parchment paper and you won't be able to boil them and 2) they will get all wobbly and lose their shape. If this happens, put the tray back in the fridge for 20 minutes or so.
 Step 10: Once the water is boiling, drop three bagels into the water. Initially, they will probably sink to the bottom and then float to the top. If the bagel hole closed up over night, you can gently stretch it out again just before dropping in the water. Let them boil on one side for 10 seconds and then flip them over onto the other side for another 10 seconds. In reality, if you're doing three bagels at a time, by the time you've put the third bagel in the water, the first one is read to flip over, and by the time you've flipped the third bagel, the first is ready to come out. Don't worry too much if you can't tell which one went in first or which ones have/have not been flipped--it's not an exact science. The idea is that the bagel has been briefly boiled and then removed from the water.
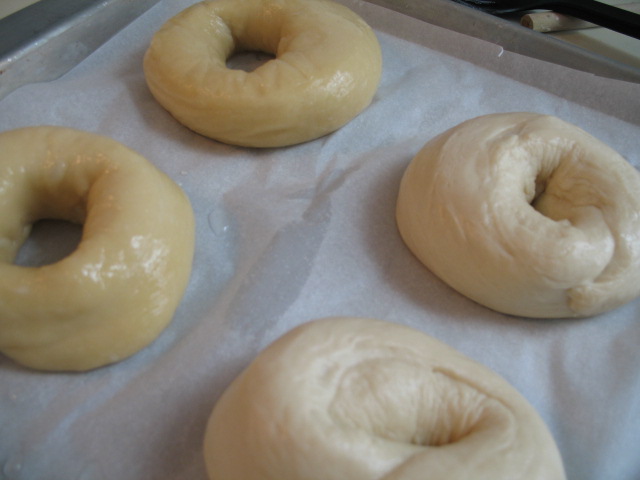 Replace the boiled bagels in their original positions on the parchment-lined baking sheet. Allow the water to return to a boil and then boil the rest of the bagels in batches. (In the picture to the left, the bagels on the left side of the picture have been boiled and the ones on the right have not. You can see that the boiled bagels have a slight caramel tint and the surface looks rubbery instead of doughy. Huzzah!)
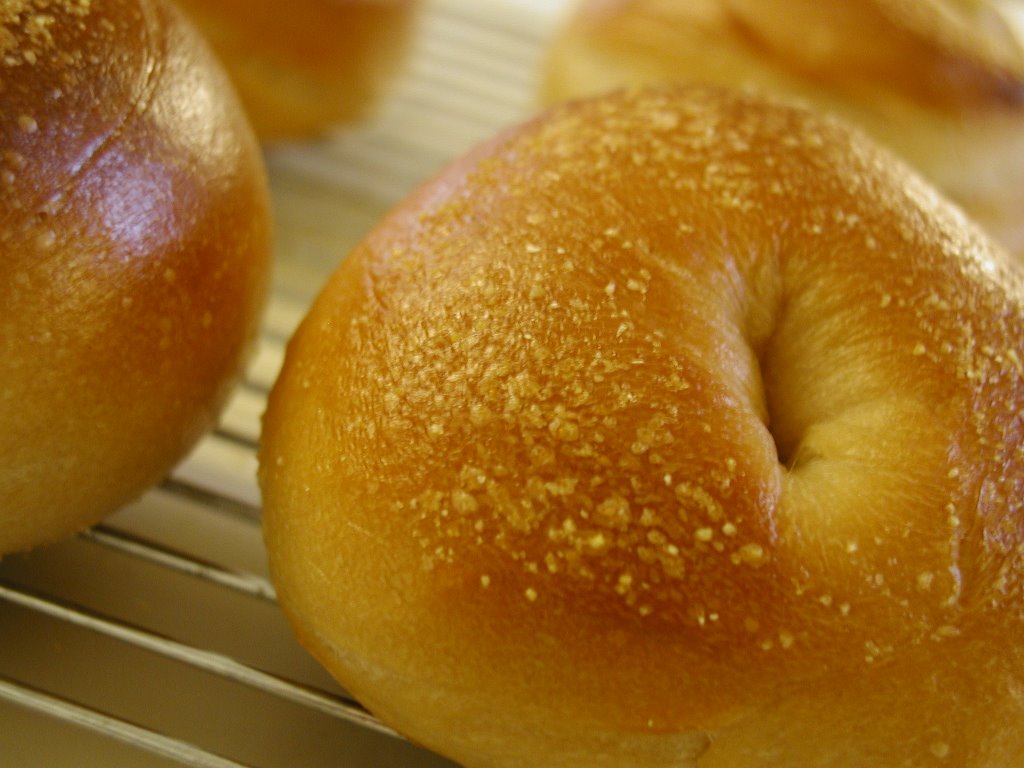
Step 11: Once the all the bagels on the first tray have been boiled, bake them in the oven for a total of 20 minutes. Rotate the bagels about halfway through for even baking. Keep an eye on them--depending on your oven, they might be done sooner or later than 20 minutes. You're aiming for a deep caramel brown color and a shiny crust. You should see little 'fish eyes' on the
 surface of the bagels--little bubbles in the crust where carbon dioxide was trapped (click on the image to the left to enlarge it and you can see the fish eyes).
Repeat with any other trays of bagels. Unlike regular bread that needs a longer cooling time to set the crust, bagels can be eaten immediately. They are best served when they've cooled just enough to be able to bite into them without burning your mouth. Any leftovers will keep in a zip lock bag or Tupperware for about a week and are fantastic toasted.

No comments:
Post a Comment