Monday, December 11, 2006

Rebellion in my Roasted Veggies

I'm a bread and butter kind of girl. Cooking and eating fancy meals is just dandy for special occasions, but what I'm really interested in is what people eat every day. I like to keep it simple and keep it good. Good food doesn't need to take 10 hours to prepare or call for a million ingredients or use expensive spices in order to be good. You don't even need to be a master chef in order to make it good. You just need to want it to be good.

Two years ago, I didn't know how to cook. The Engineer and I subsisted on stir-fries and rice, pasta and jar sauce, and runs to Anna's Taqueria for burritos. Then I started doing WeightWatchers. And I realized that eating well was really boring. No flavor. No feeling of being full. No satisfaction of any kind. I felt that the only choice being offered was between eating what tasted good and being 'ok' with the portly consequences or eating boring food and staying healthy-thin. I felt miserable and trapped and angry.

And that's how cooking became my rebellion. I wanted my food to be good. I wanted it to taste good and be good for me at the same time. I wanted this in a way that I felt in my gut and my heart. I absolutely did not believe that my only choice was between good-tasting food and good-for-you food. So I started to cook.

Two years later, I have a lot more confidence in the kitchen. I try new recipes as I come across them and will reincarnate recipes to my own tastes if I think the original had potential. I know where I can cut corners and use low-fat ingredients, but add a few 'regular' ingredients to bring out a good balance of flavor. And I've loosened up a lot. I'm a recovering perfectionist and it's still hard to try a new ingredient without knowing how it will taste or not feel like a failure if a recipe doesn't turn out brilliantly.

I've also worked on expanding my portfolio of "Tastes That I Like." In a recent interview with Seth Roberts on The Restaurant Guys (Click HERE to download the interview), Roberts mentions that Americans tend more and more to eat foods with the same flavors. Walk into any fast food burger joint in the US and order any burger and I guarantee that it taste pretty much like any other burger you would order anywhere. On top of that, Roberts says that people tend to eat the same basic foods with the same basic flavors over and over again--their daily diets don't change. Although Roberts didn't go into this in his interview, what this tells me is that a lot of people out there are no longer really able to recognize what tastes good; they only recognize what is familiar.

When I first started cooking, I was only able to recognize when I didn't like something that I ate--it was too bland or too over-cooked, etc.--but I couldn't identify what was missing or how to make it better. It took a lot of trial and error in order for to figure out what flavors I liked, how much of a particular flavor was good, and what flavors went together. Chefs and foodies call this 'expanding your palate.' I'm still figuring this out and have gotten more adventurous about trying new combinations of ingredients and spices (Lemon-Anise Muffin recipe coming soon!).

So, bread and butter. When I was in college, my dad sent me a post card that said, "To simplify, you have to say no." That post card has hung next to every desk I've had since and I often think about it when I'm in decision-making situations--whether that situation is what to wear in the morning, how to handle a new project, or what ingredients to add in my soup. Simplify. Keep it simple and keep it good, that's how I roll.


-----

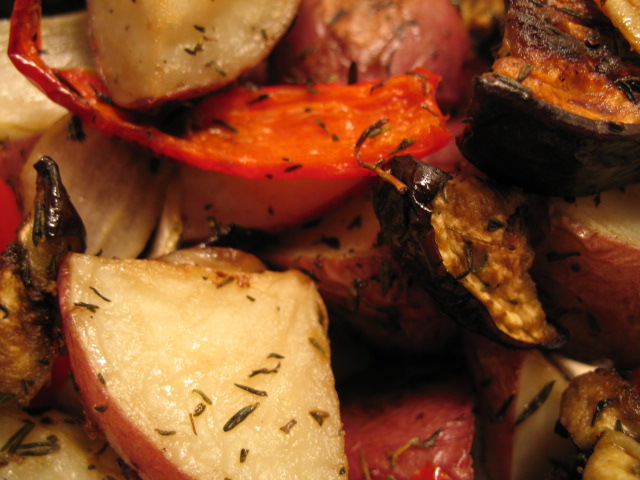
Oven-Roasted Vegetables

small red or white potatoes (2" - 3" across)--estimate about 2 potatoes per person plus one for the cook--halved and quartered
1 large onion--cut into wedges
1 red pepper--cut into chunks
1 zucchini/eggplant/summer squash--cut into chunks
Salt to taste
Thyme, rosemary and/or oregano to taste

Note: The potatoes should be cooked separately from the other veggies. Not only do they take longer, but other veggies tend to release water as they bake, which prevents the potatoes from crisping. If baking both potatoes and veggies, put the potatoes in the oven 10-20 minutes before the other veggies so both trays will be ready at the same time.

Preheat oven to 425 degrees.

Potatoes: Put the potatoes into a bowl by themselves. Drizzle 1 tablespoon of olive oil over the potatoes. Add 1 teaspoon of sea salt and 1 teaspoon of dried thyme, rosemary, or oregano (or any combination of these herbs equalling about 1 tsp). If using fresh herbs, increase the amount by 1/2 to 1 tsp. Line a baking sheet with aluminum foil, spray with non-stick coating, and spread potatoes over sheet. Bake for 40-50 minutes until browned and crisp, stirring occasionally to prevent the potatoes from sticking.

Other veggies: Combine the other veggies in a separate bowl, drizzle with 1 tablespoon of olive oil and add herbs. Line a second baking sheet with aluminum foil, spray with non-stick coating, and arrange veggies. Bake for about 30 minutes, stirring occasionally, until onions are crisp at the edges and caramelized, and the other veggies are cooked through.

Combine veggies and potatoes, adjust spices to taste, and serve!

WeightWatchers: Small potatoes are about 1 point each. One tablespoon of olive oil is 3 points. If cooking with 8 potatoes and 2 tablespoons of olive oil (total--one tablespoon for each bowl), the total points for the entire mess o' veggies is about 10. In other words, this is a very WeightWatcher's friendly meal or side-dish! I usually combine about 1 cup of roasted veggies (about 1 point) and 3/4 cup of rice (3 points) for a more satisfying meal.

Saturday, December 2, 2006

Enchiladas--A good use of leftover turkey

I know, I know--Thanksgiving is but a distant memory and you're on to bigger and better things by now. Unfortunately, between end-of-production-season frenzy at the Noodle Factory and Blogger being wonky on me, I've fallen a bit behind on my A-game here. Regardless, I'm sure there are some of you who still have a few morsels of dried-out turkey lurking in some forgotten container at the back of your fridge. You've had it on sandwiches. You've made soups. You've re-heated it until it can't be re-heated no more, no more. And now, not only are you sick of it, but your good Midwestern waste-not-want-not roots just won't let you throw away those last few mouthfuls that aren't even enough meat for a whole sandwich. Well, here is one last turkey left-overs resurrection for you to enjoy. If you don't have as much meat left as the recipe recommends, just throw in some veggies to fill it out. (Notes on completely vegetarian versions are at the end of the blog.)

Turkey Enchiladas


1 c. (4 oz) turkey or chicken breast--shredded or chopped into small chunks
1 jar salsa (~12 oz or so)

1 c. cheese--shredded
1 can black beans--drained and rinsed
1/2 c. non-fat plain yogurt
1 tsp chili powder (to taste)
1/2 tsp cumin (to taste)
1 tsp salt (to taste)
8 6"-flour tortillas

Preheat oven to 400 degrees.

Spread a thin layer of the salsa on the bottom of a 10x6 inch baking dish.

In a medium-sized bowl, mix the turkey, 1/2 cup of the cheese, the yogurt, the beans, and the spices. Taste a bit of the mixture to make sure you like the spices; add more spices if it doesn't have enough taste for you, but remember that you'll be eating this with salsa. Lay the tortillas out on a clean counter top and divide the turkey filling equally between each. You want the mound of filling to be toward the bottom third of each tortilla in a roughly rectangular shape.

Begin rolling up the tortillas. Fold the bottom (smaller) flap over the filling. Tuck in the sides. Roll the tortilla away from you until the filling is completely wrapped. (Chow.com has a great demo on the best way to roll up a tortilla for a burrito-type wrap HERE--it's toward the middle of the article.) Lay the enchilada seam-side down in your baking dish. Repeat for the rest of your enchiladas.

Pour the remaining salsa over the enchiladas, and then top with your remaining 1/2 cup of cheese. Cover with tin foil and bake about 20 minutes. Remove tin foil and bake for another 5 minutes until the cheese is completely melty and a little crispy-looking. Enjoy!

NOTES:
  • I found that one jar of salsa wasn't quite enough. I recommend using one whole jar of a chunky salsa (use some in the filling and some on the top), and then about half of a jar of a thinner, sauce-like salsa to make sure you get the moisture to really drench the enchiladas. Alternatively, you could use one jar of salsa and a bit of crushed or pureed tomato.
  • Any kind of salsa will do here, and whatever salsa you pick can really change the entire flavor of the dish. I used a roasted garlic salsa from Trader Joe's that was really fabulous.
  • If you're a vegetarian or simply don't have any leftover turkey or chicken on hand, you can replace the meat with other veggies. Try any or all of the following: diced onions, tofu crumbles, diced quorn, corn or hominy, zucchini, mushrooms, and peppers. Even cubed and cooked squash would make a good, sweeter version!
  • This is a pretty gosh darn healthy meal. If you're looking to make this more waist friendly, you can use a lot of low-fat ingredients and the end result doesn't taste at all low-fat. It really makes a difference to get a good quality salsa that you like and a good reduced-fat cheese like Sargento. I used 96% fat-free tortillas, nonfat yogurt, and a reduced-fat Sargento Mexican cheese mix. If you follow the Weight Watcher's program, the filling is about 2 points per enchilada and the tortillas I used were 1 point each--using my same ingredients, each enchilada comes out to about 3 points each. For dinner, 1 and 1/2 enchiladas really filled me up. Yay, cheese!

Sunday, November 26, 2006

Pecan and Salt Caramel Cheesecake

I was willing to bring any dish to Thanksgiving dinner that my host requested, but I absolutely insisted on bringing this Pecan and Salt Caramel Cheesecake. I first saw this recipe a few months ago over at Chow.com (the recipe is HERE) and immediately knew I was going to have to make it. Luckily, there was very little resistance to adding another dessert to the menu--especially one with an ingredients list like this one.

Speaking of the ingredients, my only real worry with this recipe was that it would be a complete sugar overload. I easily envision the ingredients mingling together into one uniform 'sugar!!!' instead of retaining their individual flavors. And the verdict? It's a sweet dessert to be sure, but I was surprised and pleased to taste distinct layers to the sweetness and real depth of flavor. The sour of the cream cheese complimented the buttery caramel. The graham cracker was a nice balance to the sugar and vanilla. I think with a little more experimentation and refinement of the various steps, the caramel flavor could give the whole cake a roasted, smoky flavor that would really bring it all together.

My mom asked me how many Weight Watchers points each slice of this little doozy was and I just laughed at her. Honestly, folks, I didn't even bother to figure it out. This is just one of those occasions when you just need to relax and be a glut without guilt. Having said this, I do have a few ideas for making this cake a bit more waist-friendly (see below).

Some thoughts for improvements and future variations:

  • My caramel ended up with little chunks of sugar suspended in it. They weren't rock hard, didn't pose a threat to any one's dental work, and we didn't even notice them once I added the pecans, but the perfectionist in me was disgruntled. My suspicion is that I didn't stir the butter and sugar as thoroughly as I should have (I was in a bit of a rush seeing as how the Engineer's mother was arriving in about ten minutes). I've done a bit of research on the properties of sugars and making caramel sauce since making this recipe and have decided that, as you might suspect, making caramel is a bit more tricky than this recipe would lead a gal to believe. I'm actually really intrigued by the whole process since it has to do with chemical reactions on the molecular level and all sorts of science-experiment type things. I'm planning to do some more research and experimentation, and will be sure to share my findings with y'all!

  • Another caramel note: I was happy with the final flavor--it really did taste like caramel!--but I think it could have had more depth. As my pal Harold McGee says in his book On Food and Cooking, "The aroma of a simple caramelized sugar has several different notes, among them buttery and milky, fruity, flowery, sweet, rum-like, and roasted. As the reactions proceed, the taste of the mixture becomes less sweet as more of the original sugar is destroyed, with more pronounced acidity and eventually bitterness and an irritating, burning sensation." Thanks, Harold! Since my caramel could definitely be described as "buttery and milky," my suspicion is that I could have let the syrup boil for a little while longer to deepen the flavor before adding the butter and taking it off the heat.

  • I love pecans, but I'm not sure they really added very much here. The Engineer suggested briefly dry-frying or roasting the pecans before adding them to the cake. This is something that is often suggested in other recipes I've come across in order to activate the oils in the nut and enhance the overall flavor. I also think that roasting the pecans would bring out similar flavors in the caramel.

  • I also wondered about doing away with the pecans all together and instead sprinkling roughly crumbled graham crackers on the top. This would add a bit more crunch and bite in the mouth, would mirror the graham cracker crust (of course), and would also reduce the number of ingredients competing for precedence in your mouth. The taste of the cheesecake and caramel is complex enough, and unless the pecans are really enhancing the flavor in those components, I think they're just distracting. Again, I think graham crackers could compliment the flavors just as well if not better.

  • I am curious to make a lower-fat version of this cheesecake. A recipe for New York Cheesecake in The Best Light Recipes by Cook's Illustrated suggests replacing the cream cheese with a combination of light cream cheese, drained cottage cheese, and drained low-fat yogurt. The recipe is described as definitely tasting different than regular cheesecake, but just as excellent on its own merit. I've tried several recipes from this book and have been well pleased with many of the recipes, which don't just rely on using the "Low Fat" version of a full-fat product. Worth a try anyways.

  • It would also be fun to experiment with different flavors in the caramel. This could be done by either infusing the syrup while it's melting or by adding flavors to the final caramel as it's cooling. Cook's Illustrated has several mouth-watering suggestions: Orange-Espresso Caramel Sauce, Coconut Ginger Caramel Sauce, and Dark Rum Caramel Sauce, to name a few.
Some serving suggestions:

  • I think that this recipe could translate really well into a finger-food, buffet-table item. My thought is to make the cheesecake as normal, but then cut out mini-cheesecakes (either in square or in circles using a biscuit cutter) that would be about an inch or so across--small enough to be eaten in one single bite. Then use a chopstick or other poking-device to dowel a little hole in the top of the cake. Fill the hole with caramel and top with one whole pecan or a fragment of graham cracker.

  • Another serving option would be to make several mini-cakes in individually-portioned ramekins. This would be fun for a dinner party and would be a bit more elegant than cutting slices of cheesecake.
Ok, ok, enough jabbering. Here's the recipe itself:

-----

Pecan and Salt Caramel Cheesecake
Adapted from Chow.com

Crust:

1 1/4 c. graham cracker crumbs (5-6 graham cracker rectangles)
4 tbsp (1/2 stick) unsalted butter--at room temperature
3 tbsp granulated sugar

Cheesecake:

2 lbs (4 8-oz packages) cream cheese--at room temperature
1 c. granulated sugar
1 large egg yoke--at room temperature
3 whole eggs--at room temperature
1 tsp vanilla extract

Caramel Topping:

1 c. granulated sugar
4 tbsp (1/2 stick) unsalted butter--at room temperature
1/2 c. heavy cream--at room temperature
1 c. roughly chopped pecans
1 large pinch sea salt

To begin:

Place all ingredients (included refrigerated ingredients) on workspace. Allow refrigerated ingredients to come to room temperature. The butter should be soft and malleable. Eggs can also be placed in a bowl of hot water to bring them to room temperature.

Preheat oven to 350 degrees.

To make the crust:

To make graham cracker crumbs, break several squares of graham crackers into rough pieces in a bowl. Use the bottom of a cup or a pestle to grind the crackers into uniform-sized crumbs. This was one of the most satisfying parts of the process--I may start crumbling graham crackers for stress relief. Mix sugar into the crumbs. Mix in the butter with your hands, squeezing gobs of butter together with the crumbs with your fingers, until thoroughly combined. Press into the bottom of a 9- to 10-inch spring form pan. (If you don't have a spring form pan and want to make this cake in a regular pie dish, make sure to use a deep dish pan at least 2.5 inches deep. There's lots of toppings that go on this and the cheesecake with rise quite a bit in the oven!)

To make the cheesecake:

In the bowl of a stand mixer (or medium-sized bowl if using hand mixers), roughly combine sugar and cream cheese with a spoon. Once the sugar is adhered to the cream cheese, beat with a mixer until light and smooth--about the consistency of ganache frosting. Add the eggs one at a time, mixing until the egg is completely blended in (but be careful of over-mixing; the egg should just be barely blended so you can no longer see strings of the yellow yoke). Add vanilla extract and mix.

Pour mixture into the spring form pan on top of the graham cracker crust. Bake until a toothpick or a cake tester comes out clean and the center is set. The Chow.com instructions say this will take about 40 minutes, but mine ended up taking about 55 minutes, so just monitor your cake carefully. It will rise significantly in the pan and turn a deep golden color around the edges. It will also likely crack along the top--this is not so desirable in normal cheesecake, but fine for this one--just more nooks and crannies for the caramel!

Let the cheesecake cool completely on a cooling rack with the spring form still attached to the base. As it cools, the cheesecake will sink a bit into itself. Ultimately, the sides will be sloped slightly higher than the middle.

For the caramel:

Combine the sugar and 1 tablespoon of water in a small saucepan and stir until you make a thick sugar paste. Place over medium-high heat and bring to a boil. At this point, the Chow.com recipe says to allow the mixture to boil until it is amber in color. While this is true, I think it's a bit misleading about what you should expect.

In this first picture (left), the sugar/water paste has just come to a boil. It looks a bit shiny, but is still a grey color. This will boil furiously for a few minutes without changing color and the boiling will slowly begin to stop. In my first batch of caramel, I kinda panicked at this point and assumed that I had done something wrong since it wasn't changing colors. I stirred it a bit, and the mixture started to reform itself into granules of sugar (the middle image). I waited for a while longer and noticed that the sugar on the bottom was melting again, and the re-melted sugar was indeed turning an amber color. However, the sugar was really clumping together and looking more like rock candy than sauce, so I dumped it into a pan to cool (far right picture) and started over again.

My recommendation is DON'T STIR the mixture--a crust will form on the top and you'll see it pushing and dipping here and there as the sugar melts into a liquid again. Eventually (in about 5 minutes or so), the crust will melt as well and you can stir it a bit. I wasn't sure exactly what constituted an 'amber' color, so I erred on the side of caution and called it good when the sugar was about the color of browned butter.

Add the butter to the pan, and be careful because the mixture will pop and bubble and generally behave like a spoiled brat of a sauce. Stir until the butter is completely combined with the sugar. Remove from heat and add the cream in two batches. Again, the mixture will boil and bubble, toil
and trouble, for a bit. Keep stirring until everything is well combined and the caramel is a milky tan color. As you stir and the sauce cools, it will thicken slightly into a more familiar caramel consistency. The milk and butter also stabilizes the caramel, so it won't harden into rock-candy and will stay a thick syrup.

When the caramel has cooled to room temperature (you should be able to dip your finger in for a taste test), pour it over the cheese cake. Sprinkle a few pinches of sea salt over the top and then sprinkle on the pecans.

Once the bottom of the pan is cool enough that you can touch it with your bare hands, cover and let the entire cake cool in the fridge. The longer it sits, the more the caramel will absorb into the nooks and crannies of the cheesecake. If you like this effect, let it sit for a few hours (for instance, while you're eating turkey n' stuffing). If you like your cake pristine and the layers separated, serve it a bit sooner.


Tuesday, November 7, 2006

Il Lasagna Perfetto

You should all know by now that I love to cook. No doubt about it. But what I do not love is cooking every day. In fact, if I have to cook two days in a row, I get a bit cranky and start taking out my frustrations on the unsuspecting Engineer by muttering things under my breath like, "Though I may look and occasionally act like a 1940's housewife, I am not a 1940's housewife, mister." * He usually grins and says, "Pizza, then? Where are my keys?"

This is why I love love L-O-V-E love making humungoid meals
one or two times a week that will feed us both for lunch and dinner over several days. Luckily, the Engineer and I are both fairly monogastronomic (yes, I made up that word) and don't require a lot of variety in our diet to keep us satisfied. Throw in a few meals of eggs n' toast and a coupla stir fries and we're happy clams.

Whenever I come across a new recipe that I think has potential for deliciousness, I immediately begin to consider of two things: 1) How can I double or triple the amount of servings in this Bad Larry, and 2) How can I make it healthier? (The answer to both questions, by the way, is usually "add more vegetables." Just don't forget to adjust the spices.) I typically follow the recipe exactly one time and then modify on subsequent repetitions.

I've been working on my lasagna for about two years now--how's that for tenacious? My family was staying in a rented cabin tucked into the woods somewhere near Lake Superior--a winter vacation tradition in my family. The cabin came equipped with hand sewn quilts, a gorgeous view of one of Minnesota's 10,000 lakes, and a little kitchen of its own. After we were settled into our various cozy nooks, my mother started making "I'm-cooking-who-wants-to-help?" noises in the kitchen and organizing the various ingredients for lasagna.
Lasagna was a regular meal in our house--in fact I think it was my all-time-favorite food for a good chunk of elementary school, much to my mother's delight and disbelief. But this was the first time I consciously helped my mother make lasagna and recognized it as a meal that I could replicate for myself. It was a light bulb kind of moment.

At this time, my mother had been on WeightWatchers for a few years, but I hadn't yet started. As we got everything together, my mom explained the various substitutions she made to make the lasagna WeightWatcher's friendly: substituting lo-fat cottage cheese for
ricotta, using only 10 lasagna noodles over two layers, fattening up those layers with lots of veggies, and using a tomato sauce like Healthy Choice. I was intrigued, if skeptical, and was incredibly surprised at how fabulous it turned out. This lasagna did not taste like the lo-cal, limp, healthy-shmealthy dish I was expecting, and I was very relieved to see that the servings were much larger than a postage stamp. Mom's technique of using dry lasagna noodles in the layers rendered noodles that were al dente and richly flavored with absorbed tomato juice. Every bite was full of perfectly cooked vegetables, a bit of meat, a bit of noodle, and a bit of cheese--chewy and moist and perfect.

When I went on WeightWatchers myself a little over a year ago, I made Mom's recipe for lasagna often, but somehow it
wasn't quite as good as I remembered it. And although it was already significantly healthier than regular lasagna, I still grumbled about how much of my daily food allowance a slice would use up. Did I really need to use tomato sauce, or would crushed tomatoes work just as well? Did I need to use a whole pound of hamburger, or could a smaller amount still give that same meaty flavor and chew in every bite? To the kitchen I scurried.

I didn't go completely bananas and make 10 batches of lasagna in a weekend, but I kept notes on each batch I made and tried new little tweaks and twiddles each time. Crushed tomatoes does indeed make a good substitute for tomato sauce, though the flavor was a bit metallic and acidic until Mom suggested sprinkling just a touch of sugar over each layer of tomatoes. You don't taste the sugar specifically in the finished lasagna, but the metallic flavor was gone. Turns out that you can also get away with less meat (or meat-substitute if you're a veggie)--about 3/4 of a pound was good, and if you were really gung ho, you could happy reduce that further
or even cut the meat out all together. Just veggies makes a terrific lasagna on its own. I also tried using non-fat ricotta cheese and decided that I liked that traditional Italian flavor and mouthfeel. These three changes, along with experiments on spices and amounts of spices, has given me a purty darn near perfect lasagna, which I've now happily eaten for two weeks straight. But hey, that's monogastronomic ol' me.
-----
Il Lasagna Perfetto

10 dry lasagna noodles (not 'no boil')
1/2 - 3/4 lb of ground lean turkey, lean beef, or meat substitute
(optional)--cooked
1 28-oz can crushed tomatoes
2 1/2 tsp sugar
1 onion--diced
1 small eggplant, zucchini, or summer squash--diced
1 red bell pepper--diced
1 pkg baby bella mushrooms or portabella mushrooms--diced
1 c. non-fat ricotta cheese

1/2 c. low-fat cottage cheese
2 c. low-fat shredded cheese
1 tsp sea salt
1 tsp chili powder
1 tsp dried basil
1 tsp dried thyme
1/8 cup of water or chicken broth

Preheat oven to 400 degrees.

1. Mix all the chopped vegetables together in a large bowl and combine with all the spices. Taste a piece of eggplant or mushroom and adjust the spices if necessary--the mix should actually taste a bit too salty at this point.

2. Combine ricotta and cottage cheese together in a small bowl

3. In a 9x13 casserole dish or baking pan, spread a light layer of crushed tomatoes and sprinkle 1/2 tsp of the sugar over the top. Arrange a layer of 5 noodles--in my pan, I can fit 4 noodles length-wise and then have to break off about one inch on the fifth to fit it in along the side.

4. Spread half of the ricotta-cottage cheese mixture over the noodles. Then spread half of the veggies and half of the meat. Finally layer on about 1 cup of cheese and half the can of crushed tomatoes. Sprinkle 1 tsp of sugar over the tomatoes.

5. Add another layer of noodles and repeat step 4. Reserve a bit of cheese for the topping.

6. Swish the water or chicken broth (I prefer stock) in the empty can of tomatoes and dribble evenly over the top of the lasagna.

7. Cover the lasagna with a double layer of tinfoil and bake for 1 hour. After an hour, check the to see how done the noodles are and the onions are. I usually need to bake it covered for another 15 minutes. When the onions taste just a bit under done, uncover the lasagna and top with the reserved cheese. Bake uncovered for another 10-15 minutes or until the cheese is completely melted and a bit brown.

Let the lasagna cool for about 10 minutes and then cut into 12 portions.

WeightWatchers: If you made any substitutions or adjustments, I recommend tallying everything up for yourself to be on the safe side. Made with the above ingredients,12 portions is about 4.5 points per portion. If you're being really strict, you can cut it into 16 portions for about 3.25 points each, but, honestly, those portions are a bit measly--ok for lunch, but probably not enough for dinner unless you were also eating a side dish.

*For the record, I would like to state that while I definitely do the lion's share of the cooking in our household, the Engineer is always a willing and able sous chef. I admit to having tendencies toward control-freak-ism and have been known to hyperventilate if the onions are not diced to proper proportions. I'm much better than I used to be, mostly because I was came to realize that I needed to chill out or my sous chef would not be quite so willing and able. Still, we find it works best to divide tasks by type: I'm in charge of cutting and stir frying, and the Engineer is in charge of the pilaf; I'm in charge of toast and the Engineer is in charge of scrambling the eggs; and so on. *shrug* It works for us.

Sunday, October 29, 2006

Plonk Wines

I just discovered that the Boston Globe has a column devoted to the best plonk of the month. The explanation of the column from their website:

"This is a monthly column on $10-and-under wines we call "plonk," which began as British slang for the cheapest drink served, and is now widely used to mean simple, inexpensive bottles. "Plonk of the month" appears on the last Wednesday of the month and is posted on Boston.com.

Wines are selected to go with the season, so winter's heartier fare might lean more toward reds, but whites appear more often as the weather warms. We list several shops where you can buy these bottles, but check with your local merchant."

Here's the link to this month's column: http://www.boston.com/ae/food/gallery/plonk_september/, as well as a backlisting of their columns for the last few months. The Globe has also recently published an article entitled "Plonkapalooza" wherein they tasted 50 wines sold for around $10 or less per bottle and chose their favorite top 10: http://www.boston.com/ae/food/articles/2006/10/25/plonkapalooza/. Three cheers for good wine on the cheap!

Comfort Cookies

I grew up in the Midwest during a time when going out to eat was still considered a rare luxury and the whole idea of 'take-out' was still catching on. We had the odd Pizza Hut pizza, and I can distinctly remember a few celebration meals at Sarah's, a bone fide American steak house in Algona, Iowa. But for the most part all of our meals were cooked and eaten at home. My parents both cooked--Dad mostly managed the garden and made the breads and soups, and Mom...well, Mom did pretty much everything else. From a young age, my brother and I were corralled into chopping vegetables, stirring soups, punching down bread doughs (ok, we actually fought over who got to do that one), cutting fruit for salad, and a host of other meal prep tasks.

This all sounds very wholesome and apple-cheeked, I'm sure, but in reality, my brother and I fought all this home-cooking tooth and nail. Whole-wheat bread tasted gross and the slices were too thick for sandwiches. Home-made cookies weren't "cool" enough when packed into school lunches. Hamburgers that didn't come from McDonald's just weren't the same. We adored Halloween with its abundance of commercially-made sweetness. I'm sure Mom and Dad thought they'd given birth to palate-challenged morons, but still, they persevered. A few 5-minute time outs on the back stairs and commands to eat now-cold plates of brussel sprouts (grown in our backyard, of course) didn't faze them in the least.

Still, something must have stuck because
my brother is happily employed as a line cook in a restaurant in Wisconsin, and here I am gleefully spending a Sunday afternoon dividing my time between my foodie blog and going through back issues of Bon Appetit, Saveur, and Gastronomica. In the past few months, my mother has repeatedly said, "I never would have thought this is what you and Andy would end up getting into"--always in the same slightly incredulous voice.

So when I find myself in need of some comfort food, what I crave is chili that's been simmering all afternoon, thick-sliced bread--toasted and buttered, and perhaps most of all, home-made chocolate chip cookies. It could be that I love these chocolate chip cookies just because they're familiar, but I haven't found another cookie anywhere else that I would take over my mother's. A few years ago when I was first living on my own and had a hankering for them, I called her up one afternoon and--for the first time ever--asked her for the recipe.

This recipe is basically the same recipe that's off the back of the Nestle chocolate chip bag, but with a few modifications of ingredients and procedure. First of all, use only one stick of butter instead of two. Surprisingly, the reason for this is not to cut down on the fat but to improve the texture of the cookie. More butter will make the cookie flatter and crispier. Less fat makes a denser cookie that is chewy without being cake-y.

Second (and this is my own modification), use dark brown sugar instead of light brown sugar. Dark brown sugar gives the cookie a deeper flavor with the subtle taste of molasses. I feel this creates a nice balance to the sweetness of the white sugar and compliments the semi-sweet chocolate.

Third, all of the ingredients should be room temperature, especially the butter and eggs. It's best if you let them come to room temperature on their own, but in a pinch you can microwave the butter for a few seconds until soft and put the eggs in a bowl of hot tap water for about 5 minutes.

And fourth, add the flour last (except for the chocolate chips) and mix very little to avoid forming any gluten. Developing the gluten in the flour will make your cookies hard and tough. You want a little gluten development for the chew (which is why you use all-purpose flour instead of pastry flour) but not too much.

Everyone has their own version of the perfect cookie, and this one is definitely mine. Chewy and moist, plenty of chocolate chips, not too sweet--it takes me right back to those school lunches trying fruitlessly to trade them away for Kudos bars and Chips Ahoy. But really? I was just as glad to keep them for myself.

-----

Francis Family Chocolate Chip Cookies
modified from Nestle's Chocolate Chip Cookie recipe

Makes about 36 large cookies or 72 small cookies.


3/4 c. white sugar
3/4 c. dark brown sugar
1 stick real butter (softened)
2 eggs (at room temperature)
1 tsp vanilla
1 tsp salt
1 tsp baking soda
2 1/4 c. all-purpose flour
~2 c. (about 1 bag) of chocolate chips

Preheat oven to 375 degrees.

Mix the two sugars together in a medium sized bowl. Mix in the butter gobs at a time. Mix in the eggs and vanilla, and then the salt and baking soda. Mix all of these ingredients as much as possible until the batter is smooth, shiny, and a rich brown color.

Add the flour all at once and mix as little as possible (to avoid forming gluten, which makes tough cookies). I prefer to fold the flour into the batter until it's evenly incorporated. To do this, run a long-handled spoon or spatula around the edge of the bowl under the batter. Smoothly lift the batter slightly and fold it toward the center of the bowl. Continue doing this at intervals along the entire circumference of the bowl and then continue until all the flour is incorporated. The dough will look like a grainy, light brown paste.

Stir in the chocolate chips all at once, again mixing as little as possible (and again, I prefer to fold the chocolate chips into the batter).

Drop batter onto a parchment-lined baking sheet using a full tablespoon (for larger cookies) or a well-rounded teaspoon (for smaller cookies).
Space them about two inches apart--they will spread a tiny bit as they bake. Bake for 9-11 minutes until the 'peaks' on the cookies are just starting to brown (leave cookies in longer for crunchier cookies). Allow to cool for about 5 minutes on a cooling rack before devouring. (I know it's hard, but it's worth it. If you eat them right away, not only will you burn your tongue and thus not be able to enjoy anymore tasty treats for a while, but when it first comes out of the oven, the cookie is actually still quite liquidy and will collapse on itself and on you until it has a few minutes to set.)

-->Large cookies are about 3 inches in diameter and are about 3 WeightWatchers points each.
-->Small cookies are about 1.5 inches in diameter and are about 1.5 WeightWatchers points each. (By the by, these smaller cookies definitely do not feel skimpy. They pack the same flavor, chew, and chocolate as the regular cookies--they're just portion controlled. I think the small cookies are the perfect size for feeling like you really had a good, satisfying treat.)

Sunday, October 22, 2006

Bagels n' Brunch

'Twas the Engineer's birthday this past weekend and we had his family over for brunch. Yee-haw, what a spread! Never was there a more perfect union of breakfast and lunch, or a better brunch been brunched. As we all sat there patting our stomachs and dabbing butter from our chins, the Engineer said, "We should really do this more often! No, really!" There was a little bit of something for everyone: the Engineer crafted gigantic omelets with cheese and ham and onions and peppers (from my garden, in fact!); we bought the "fancy" (read: slightly more expensive) bacon; the Mother of the Engineer arrived hidden behind a bowl of cut fruit that was half the size of our dining room table; the Father of the Engineer produced lox and cream cheese like a magician; tea and cider and organic pomegranate juice were drunk with reckless abandon. And what, you ask, was my contribution to this Brunch Debauchery? Well, one can't exactly have lox and cream cheese without bagels, now can one?

Bagels are one of those mythical bread products that home cooks speak about in hushed voices and wit
h much incredulous shaking of the head. Well, the biggest mystery seems to surround this whole issue of boiling. To boil or not to boil? How long? Why boil in the first place? WTF?!

The secret to baking a good, chewy bagel is actually a combination of boiling the bagels very briefly and then baking until golden brown on the outside. Bagels should be boiled for a total of at least 20 seconds and certainly no more than 30 seconds. This is just long enough to cook the outside layer of dough, which kills the yeast on the surface (making a tight, chewy skin), caramelizes the outside starches, and gives the bagel its nice shine. Boiling the bagel for any longer just makes the skin thicker and and more inelastic, and gives you a final product as dense as a hockey puck. You want some elasticity in the skin so the bagel can still rise a bit in the oven and so that the bagel is still...well...edible.

One other essential step to making good bagels is a retarded rise (a long, slow rise at a low temperature) overnight in the refrigerator. This improves the overall taste of the bagels and the structure of the interior crumb. (For more info on the how and why of retarded rises, click HERE.) Using high-gluten flour
will also help improve the internal structure and chew. It's great if you have access to it, but for the home-baker, all-purpose flour works just as well.

It takes some planning and some trial 'n error, but making good quality bagels at home is not nearly as mysterious or as impossible as rumor would have you believe. For those of you out there saying,
"Bake bagels, who me? Naw, I couldn't!" Oh, pshaw, y'all! Read on:

Bagels
from Breads from the La Brea Bakery by Nancy Silverton

Makes about 18 bagels


12 oz (~1 1/2 c.) water
2 tsp yeast
13 1/2 oz (~1 1/2 c) sourdough starter*
2 lbs (~6 1/2 c) all-purpose flour
2 oz (~1/4 c) sugar
1 tbsp sea salt
2 tbsp barley malt syrup**
6 tbsp milk powder

*If you don't have SD starter, substitute 6.5 oz water and 6.5 oz flour. You shouldn't notice anything too different in the final flavor or texture--I'm just a SD fiend, so I throw it in everything!
**It took me a while to find barley malt syrup--try Whole Foods, Wild Oats, or another natural food store. (Trader Joe's does NOT carry it.) It's not 100% essential to the quality or the baking of the bagel, but does enhance the flavor.

Making the Dough

(note: bagel dough is very dense and stiff, so it's easiest to mix it in an electric stand mixer, at least for the initial mixing of the ingredients. Keep a close eye on your mixer, though, to be sure it's not straining too hard to mix the dough and wearing on the engine. Also completely fine to mix by hand.)


Step 1: Pour water into a bowl and add yeast. Allow yeast to dissolve and ferment for about three minutes, and then mix in the sourdough starter. Add sugar, salt, malt syrup, and milk powder, and stir to combine.

Step 2: Add in flour one cup at a time. This is one bread where you actually want to add as much flour as you can. Having said that, keep an eye on the dough--you don't want it to get too dry. The dough should be moist and slightly tacky too the touch, but shouldn't stick at all to your hands or the counter. The dough will be very stiff and dense. The recipe calls for 6.5 cups, but I usually end up adding about 5.5 cups.

Step 3: Turn the dough onto a floured counter-top and knead the dough for 15-20 minutes until all the flour (or as much as you can get into it) is incorporated and the the dough springs back when you press your finger into it. As the dough is so stiff and difficult to knead (dang, those arms get tired!), I recommend doing the kneading in two shifts of 10 minutes, letting it rest for about 5 minutes in between shifts.

Step 4: Cover the dough with plastic wrap and allow to rest for 10 minutes.

Shaping the Bagels

Step 5: Cut the dough into 18 pieces (about 4 ounces each). Cover with plastic wrap and allow to rest for 15 minutes. (These "rests" give the gluten time to relax and make it easier to shape the bagels. Without resting, the dough would tend to tighten up and spring back from whatever shape you give it.)

Step 6: Working one piece of dough at a time, shape the dough into a rope 6-8 inches long by gently rolling the dough between the palm of your hand and the counter top. As it forms into a rope, use two palms to continue lengthening.

Step 7:
Take one end of the dough rope between your thumb and forefinger. Wrap the dough around the back of your hand and overlap the two ends by about an inch or so. With the overlapped ends at the center of your palm, seal the ends by rolling the rope back and forth against the counter top. If the ends keep unsticking, use a dab of water to 'glue' them together.

Step 8: Stretch the finished bagel a bit to make the hole bigger and then pla
ce it on a parchment-lined baking sheet. Repeat Step 6 and Step 7 with the rest of the dough, spacing the bagels about two inches apart on the baking sheet. Cover with plastic wrap and refrigerate for 12 -24 hours (this is the 'retarding' step).

Boiling and Baking the Bagels

Step 9: About an hour before baking time, pre-heat the oven to 450 degrees. About a half an hour bef
ore baking time, set a large stockpot filled with at least 4 inches of water to boil. Just before the water begins to boil (about 5 minutes before bake time), take the first sheet of bagels out of the fridge (leave any other sheets in the fridge).
Note: All you want to do here is take the chill off the bagels. Do NOT let the bagels come completely to room temperature or they will 1) stick to the parchment paper and you won't be able to boil them and 2) they will get all wobbly and lose their shape. If this happens, put the tray back in the fridge for 20 minutes or so.

Step 10: Once the water is boiling, drop three bagels into the water. Initially, they will probably sink to the bottom and then float to the top. If the bagel hole closed up over night, you can gently stretch it out again just before dropping in the water. Let them boil on one side for 10 seconds and then flip them over onto the other side for another 10 seconds. In reality, if you're doing three bagels at a time, by the time you've put the third bagel in the water, the first one is read to flip over, and by the time you've flipped the third bagel, the first is ready to come out. Don't worry too much if you can't tell which one went in first or which ones have/have not been flipped--it's not an exact science. The idea is that the bagel has been briefly boiled and then removed from the water.

Replace the boiled bagels in their original positions on the parchment-lined baking sheet. Allow the water to return to a boil and then boil the rest of the bagels in batches. (In the picture to the left, the bagels on the left side of the picture have been boiled and the ones on the right have not. You can see that the boiled bagels have a slight caramel tint and the surface looks rubbery instead of doughy. Huzzah!)

Step 11: Once the all the bagels on the first tray have been boiled, bake them in the oven for a total of 20 minutes. Rotate the bagels about halfway through for even baking. Keep an eye on them--depending on your oven, they might be done sooner or later than 20 minutes. You're aiming for a deep caramel brown color and a shiny crust. You should see little 'fish eyes' on the surface of the bagels--little bubbles in the crust where carbon dioxide was trapped (click on the image to the left to enlarge it and you can see the fish eyes).

Repeat with any other trays of bagels.
Unlike regular bread that needs a longer cooling time to set the crust, bagels can be eaten immediately. They are best served when they've cooled just enough to be able to bite into them without burning your mouth. Any leftovers will keep in a zip lock bag or Tupperware for about a week and are fantastic toasted.

Saturday, October 14, 2006

Red Truck Wine

I don't think anyone would ever confuse me for a 'picky' wine drinker. Only once can I remember loathing a bottle so much that I actually poured it down the drain: a particularly atrocious and vinegary red that I couldn't even bear to use in tomato sauce. Occasionally I find myself present at a dinner where a sample of some $50+ bottle of wine finds its way into my glass. (Yay verily, it is good to know folks with expense accounts. Yay.) But really, I'm quite happy sticking to the top half (ok, top quarter) of the wine list, and I find myself pretty happy with everything in that range. For reds, I like syrahs, Chiantis, and Merlot. For whites, I go for pinot grigio and pinot gris. My standby red is Yellow Tale Shiraz (retails at about $7), and my go-to white is Grigio Luna (retails at about $5.50). In my opinion, these are good, solid, dependable wines that are always good in a pinch.

But then a few weeks ago, something happened that caused my hand pause, hovering uncertainly, on its familiar course toward the Yellow Tail and my eye wander nervously toward the rows of neighboring wines. I had come across a blog called "The Cellar Rat" by Alan Baker: a blog discussing all things wine-related wherein he finds nothing shameful in picking from the top of the wine list and enjoying a bottle for $10. He says as long as you enjoy it, drink it. On his blog and in his podcasts*, he documents his exploration of the wine-making industry from the vine to the bottle. Baker worked in broadcasting in Minnesota for years, and then about two years ago, decided he was in need of a life change and moved to California wine country to explore the wild and gnarly world of wine making. He worked at a vineyard for a season and is currently experimenting with bottling his own "Rat Cellar" wine. His blog and podcasts include everything from explanations of the wine making process and wine vocab for the layman, coverage of local wine-tasting events, interviews with wine-makers, and of course his own opinions on various wines. Baker's blog (with links to his podcasts) is http://www.cellarrat.org (or click HERE). Since I started listening to his podcasts, I feel like I've been given permission to go forth and sample, dismissing that which is gross, and happily collecting that which I like.

On a recent trek to Trader Joe's, I picked up a bottle of Red Truck 2004 California Red Wine for $7.99. I'd heard this wine recommended a few times over on Chowhound.com, but hadn't tried it because I'd previously assumed that blended-grape wines were "uncool." I have no idea where I got that impression, but with my new found, Cellar Rat-inspired confidence, I didn't even hesitate before putting a bottle in my cart. Now, I'll tell ya, rarely do I open a bottle of wine, take a sip, and actually stop to say, "Wow." This stuff was good! It's a blended Syrah, Petite Syrah, Cabernet Franc, and Mourvedre. It's dark and berried, but with none of the bite or acidity that I tend to associate with many dark red wines. This is a wine meant to be drunk from a tea cup and is perfect for an evening wrapped in a blanket with a good book. It would likely pair well with red meat, spicy foods, and a chocolate dessert, though I unabashedly admit that I've been drinking it by itself all evening!

I like this new freedom of wine choice.
I'm hooked now, I'm afraid. What to do but sample more wine?

*If you're asking yourself, "Podcasts? What the heck are podcasts?" you're not alone. Apparently these things have been around for the past several years, but who knew? I've only discovered them recently myself and am still trying to master all the Cool Kid Slang so that I don't sound like a big McDork when I talk to all the Cool Kids. Essentially (and as far as I can tell), podcasts are radio shows that you can download to your computer or mp3 player and listen to whenever you feel like it. They're generally free and, much like websites and blogs, anyone and your mother can produce one and make it available for downloading with some basic electronic equipment. Check out the National Public Radio website (click HERE) and the New York Times website (click HERE) for some nationally syndicated ones.

Monday, October 9, 2006

Fall = Ginger Snaps

My version of heaven would be endless autumn. And not just the beautiful crisp weather or the flaming trees against the bluest sky, but all of it. I love wearing my winter coat for the first time and finding a few left-over memories from the previous winter stowed away in the pockets. I love going to the Farmer's Market in Copley Square. I love seeing all the fruits and vegetables spilling out of their baskets and watching the people mill around fingering the last tomatoes and asking each other how the pears are this season. I love smiling at my favorite vendor, handing him a bag of apples--a different kind every week--and asking him about the harvest. I love drinking red wine out of a tea cup, making vast pots of soup and chili for my friends and family, and leaving ginger snaps out in bowls. I love the anticipation of the holidays to come. I love that I truly believe I can finish every single one of the crafty projects I have planned as gifts for the people I love. I love it all. Autumn is a season of change and I love the feeling of living on the cusp of something new. It makes me feel like everything is possible. Everything is moving and changing. It's the moment before the adventure begins and the hero sets out with his backpack slung over a shoulder.

On my runs through the park the past few weeks, I've been listening to The Power of Myth, conversations between Bill Moyers and Joseph C
ampbell recorded before Joseph Campbell died. There are many things in these conversations that speak to me as a writer and a person in her late twenties and as a person traveling through her life. But there is one phrase that I keep coming back to. Moyers and Campbell are talking about the beginning of the journey and the types of people who become heroes in the traditional myths. The most puzzling kind of hero is the one who comes upon his adventure unexpectedly, like Han Solo in Star Wars who gets unwillingly swept into the adventure. Campbell calls this the 'serendipitous adventure,' and Moyers asks if this kind of adventurer is still considered a hero. Campbell has this reply: "The achievement of the hero is one that he is ready for, and it's really a manifestation of his character. It's amusing the way in which the landscape and the conditions of the environment match the readiness of the hero. The adventure that he's ready for is the one that he gets."

That's the line that keeps drifting through my mind as I walk through the Farmer's Market or look at the changing trees on my bus ride back from New York: "The adventure that he's ready for is the one that he gets." I feel on the verge of an adventure. I feel my life changing around me, threads of possibility and change rippling outwards. I've been playing with a lot of ideas about what I want for my future--both the near future and the far future, for my individual self and my career and my life with S., et cetera, et cetera. More specifically, I feel that my life has been moving in the direction of merging cooking and publishing and writing. This has been slowly developing over time, mostly without my knowledge, and it's a surprise to see them coming together now. I'm not sure exactly how these different things will unite, but I feel very sure that they will. For the moment, I'm happy to be on the edge of this change, feeling it grow, and not pushing things too quickly.

And in this spirit of movement and possibility, I give you my favorite cookie recipe: ginger snaps. Perfect for an afternoon snack with tea, evening dessert, or even a quick breakfast-on-the-go, the ginger snap is certainly the embodiment of possibility! My college roommate, R., was the first to introduced me to ginger snaps. A master storyteller herself, she had many eloquent things to say about the union of sweet sugar and spicy ginger, the balance of chew to crunch, and the harmony of the overall cookie. I still remember sitting in the window seat of our dorm room with her. I like to think it was autumn and maybe some afternoon sunlight was coming in through the window. She was eating a ginger snap, stolen from the dining hall, with her head tilted back and her eyes closed. S
he very precisely ate one bite of cookie, chewed thoughtfully, and handed it to me for the next bite.

Ginger Snaps
from The King Arthur Flour Baker's Companion: The All-Purpose Baking Cookbook

Makes six dozen 1 1/2-inch cookies


2 1/3 c. (9 3/4 oz) unbleached all-purpose flour

1 tsp ginger
1 tsp cinnamon
1/2 tsp cloves
1/2 tsp salt
2 tsp baking soda
3/4 c. (4 7/8 oz) shortening
1 c. (7 oz) sugar
1 large egg
1/3 c. (4 oz) molasses

for topping: 1/2 c (1 1/3 oz) cinnamon-sugar (2 tsp cinnamon mixed into 1/2 c. sugar)

Preheat the oven to 375 degrees.

Sift together the flour, spices, salt, and baking soda in a small bowl. In a large mixing bowl, beat the shortening, sugar, and egg together until light and fluffy. Beat in the molasses. Stir in the dry ingredients to make a soft, smooth dough.

Measure out slightly rounded teaspoonfuls of dough, shape into balls, and roll each in cinnamon-sugar. Place the cookies 2 inches apart on a parchment-lined cookie sheet. Bake for about 10 minutes until cookies are golden brown and ‘cracked’ on top. Cool on wire racks and store in a tightly closed container.

(Nutrition: 50 cal, 2 g fat, 0 fiber)--> Weight Watcher's = 1 point per cookie

Possibilities for decadent future versions:

* Before baking, press a thumb or a back of a spoon into each ball of dough to make a depression in the cookie. After the cookies have cooled, fill with straight cream cheese or cream cheese frosting and a bit of candied ginger.

* Instead of just powdered ginger, maybe try using a combo of powdered ginger, freshly grated ginger, and candied ginger. I think the candied ginger would be especially good for having little bits of chew in the snap. Definite danger of over-ginger-ifying the cookie, though. Experimentation required...

Monday, October 2, 2006

Books: Bread Alone

Bread Alone: Bold Fresh Loaves from Your Own Hands
by Daniel Leader and Judith Blahnik

Bread Alone provides a good, solid introduction to artisan bread baking. Daniel Leader begins with a thorough description of the equipment, ingredients, and care that go into making a good loaf of artisan bread, imbuing the reader with a real sense of the romance and long tradition of bread baking in European history. The detailed recipes are interspersed with stories of bakers and bakeries that Leader has encountered on his European travels. The recipes for classic country-style hearth loaf, sourdough starter, and pain au levain are perfect for introducing new bakers to the fundamentals of artisan bread baking, and in fact, these are recipes that I go back to again and again as springboards for experimentation.

At times, however, Leader’s reverent and weighty language can be intimidating for the novice baker and makes ‘the perfect artisan loaf’ appear attainable by only the few learned and experienced master bakers. The repetition of the even most basic instructions in every recipe and the reminders to ‘conserve your plastic wrap!’ and ‘use only the best organic ingredients!’ can feel off-putting and condescending. An added frustration is the durability of the physical book--or lack there of. After only a few uses, pages of my favorite recipes started falling out of the spine. Ultimately, I had the spine cut off (we have a nifty machine at the noodle factory that does this in about five seconds! Fancy!), punched holes in the pages, and put it in a three-ring binder. Still, practicing the basic recipes found in this book is an excellent way to begin exploring the diverse world of artisan bread baking.

Sunday, October 1, 2006

Books: The King Arthur Flour Baker's Companion

The King Arthur Flour Baker's Companion: The All-Purpose Baking Cookbook

This hefty cookbook is a veritable Mecca of recipes, baking advice, and resource information. Not only do the authors walk you through basics like white bread, chocolate chip cookies, and muffins, but they will then coach you onwards and upwards to such lofty aspirations as croissants, elephant ears, and sourdough artisan bread. If one of the ingredients is flour, I guarantee there’s a recipe for it in there. The tone throughout the book is friendly and familiar, never assuming prior baking knowledge but also including plenty for even the most experienced baker to get excited about. In addition to the recipes, boxes with helpful baking tips and background information on ingredients and recipes are scattered throughout the book. The appendix descriptions of the various equipment and ingredients one could possibly use for baking along with opinions on the merits of each item, how they can be used, and where to find them. This hard cover, 640-page book will withstand being propped up, pressed opened, dribbled upon by errant goos and powders, and still live to see another baking day. If you like to bake, this is one book that deserves a permanent place on the shelf.

Friday, September 22, 2006

Basic Pasta Sauce

Quickie post this lazy Sunday afternoon--just wanted to share my basic pasta sauce recipe with all y'all. For the longest time, I didn't question the fundamental American assumption that pasta sauce comes in jars. Period. No further thought required. Then one fateful shopping trip, while tenaciously deciphering which pasta sauce had the cheaper unit price and then asking myself if this was a sauce I actually desired to consume, it hit me. I could actually make my own pasta sauce. My own! Let me share a little secret with you: at its most basic, pasta sauce is really just...wait for it...tomatoes. Yes, tomatoes. Eureka!

Now there are about a hundred bajillion recipes for tomato sauce (basic pasta sauce) out there. By all means, go forth and sample. But if you're like me and the idea of making your own sauce is a novel shift of paradigm, here's a good place to start. The veggies I give below are my basic mix, but you can certainly add or subtract based on what you have in your fridge and your tastes.

A note on the tomatoes: If they're in season, sauce made from fresh beefsteak tomatoes is to die for. Plan extra time for it, though, as it takes a good hour or so for the tomatoes to simmer down into a sauce. However, if it's the middle of winter, if you're short on time, or if you just don't feel like it, a can of diced tomatoes is a perfectly reasonable substitute. There is no shame in home cooking. Get a 28 oz can of your grocery store fav--
I use "Nature's Promise" brand from Stop&Shop, from their new line of organic products. You can usually find cans with Italian spices or without, salted or not. If you want quick and easy, go for the pre-spiced stuff. If you're feeling adventurous, go for no spices, no salt and add your own.

A note for folks on Weight Watchers: The only ingredient adding points to this sauce is olive oil. Since such a small amount is used, I usually average this out to about 1/2 of a point (just to keep me honest). If you add in the wine, kick the sauce up to a whole point. Serve 3/4 cup of sauce over a cup of pasta for a good meal for just around 5 points.

----------

Emma's Basic Pasta Sauce
makes 6-8 servings

28 oz can of diced tomatoes with the juices--with Italian spices or not
or 2 pounds or more of beefsteak tomatoes (about 4 large), cored, peeled, and cut into 3/4-inch chunks

1 whole sweet onion--diced
1/2 large (or 1 small) zucchini--diced and salted (salt draws out the liquid in the zucchini)
1 red pepper (or orange or yellow)--diced
1/2 package of mushrooms--sliced (about 1 cup sliced)
3 medium-sized cloves garlic
2 cubes of veggie, chicken, or beef bouillon (I like using bouillon instead of broth for the concentrated flavor and to keep the amount of liquid used in the sauce at a minimum)
1-2 tsp olive oil
1/4 cup fresh basil or 1 tablespoon dried basil
salt and pepper to taste
1/2 cup of red wine (optional)

Heat olive oil in a large sauce pan or wok. Add onions and zucchini, and saute until barely translucent. Add garlic and stir until fragrant (about 30 seconds). Add peppers and stir until onions are fully translucent and zucchini is almost cooked through. Add mushrooms and saute for a minute or so. (If making sauce from whole tomatoes, do not cook the veggies as fully before adding the tomatoes. They will cook more fully as the sauce simmers.)

Add canned tomatoes (or diced whole tomatoes) and allow to come to a boil. Once boiling, add bouillon cubes, basil, and other spices. Reduce to a simmer. If using canned tomatoes, start water boiling for pasta. If using whole tomatoes, allow to simmer until sauce reaches desired consistency--between 45 minutes to 1 1/2 hours. In either case, stir occasionally.

Just before serving, stir in 1/2 cup of red wine if desired--this will give your sauce a nice depth of taste. Also, make sure the bouillon cubes are completely dissolved. There's nothing like chomping down on a bouillon cube to put you off salt for life. Or at least the next several minutes. But at least the faces you make will provide endless entertainment for any nearby guests, children, or other various loved ones.

Sunday, September 10, 2006

Fortune Cookies

A few weeks ago, one of the departments in my company became inundated with projects that had moved down the conveyor belt to their desks and all the folks in that department were suddenly up to their ear lobes with paperwork and books and e-mails ever-so-politely requesting status updates on particularly gnarly projects (some of which MAY have come from yours truly). Part good wishing, part joke, part peace offering, I made the whole gang a batch of personalized fortune cookies.

I'd been rarin' for an excuse to make these cookies ever since I saw it while flipping through a back-issue of Cooking Light at The Engineer's mom's house. They looked like such fun to make, relatively easy, and healthy to boot. All these predictions turned out to be true, but I have to admit that I was a bit disappointed with the actual cookie itself. While the cookie part of a fortune cookie is really just a clever vehicle for the afore-mentioned fortune, I still think the cookie should be worth snacking on. These cookies certainly tasted like Chinese restaurant cookies, but had none of the satisfying snap that comes when you crack it in half or the melty crunch of actually eating it. My cookies stayed relatively limp and chewy--interesting, to be sure, but not *quite* what I was going for. I'm wondering if a different mixing technique might be in order. Any suggestions?

Here's the recipe--por favor, give it a try and let me know your thoughts:

---------

Fortune Cookies
with grateful acknowledgement to Cooking Light magazine

Makes roughly 18 cookies

1/2 c. bread flour

1/2 c. sugar

1 tsp vanilla extract (almond or orange extract might be yummy too!)

2 large egg whites

20 fortunes (a few extra just in case) roughly 3 inches long by 1/2 high

Pre-heat oven to 400 degrees.

1. Combine all ingredients and mix until well blended. You should have a thin batter similar in consistency to icing or glaze (mine was just a bit thinner than pancake batter). Cover bowl with plastic wrap and chill 1 hour.

2. While batter is chilling, cover two large baking sheets with parchment paper. Using a biscuit cutter or drinking glass about 3 inches in diameter, trace three or four circles in a row along the middle of the paper. Turn paper over.

3. Spoon about 1 teaspoon of batter into the center of each circle and use the back of the teaspoon to spread the batter evenly over the entire circle.

4. Bake one sheet at a time for about 5 minutes or until the edges of the cooks are just started to get brown and crinkly. Remove from oven.

5. Use a spatula to release the cookies from the baking sheet. (Don't afraid to be tough.)

6. Working quickly and doing one cookie at a time, place the prepared fortune along the center of the cookie. Lay the handle of a wooden spoon or a chopstick along the fortune and fold the cookie over so the edges meet over the spoon handle. Press edges together. Remove spoon.

7. Pull the ends of the cookie down over the rim of a small bowl. Hold for a few seconds until set and then place cookie on a wire rack to cool completely. Repeat with remaining baked cookies.

8. Repeat entire procedure until all the batter is used. Store in an air tight container.

Calories: 37; Fat: 0.1 g; Protein: 0.9g; Fiber: 0.1g; Chol 0 mg; Iron 0.2 mg; Calcium 1 mg