I was willing to bring any dish to Thanksgiving dinner that my host requested, but I absolutely insisted on bringing this Pecan and Salt Caramel Cheesecake. I first saw this recipe a few months ago over at Chow.com (the recipe is HERE) and immediately knew I was going to have to make it. Luckily, there was very little resistance to adding another dessert to the menu--especially one with an ingredients list like this one.
Speaking of the ingredients, my only real worry with this recipe was that it would be a complete sugar overload. I easily envision the ingredients mingling together into one uniform 'sugar!!!' instead of retaining their individual flavors. And the verdict? It's a sweet dessert to be sure, but I was surprised and pleased to taste distinct layers to the sweetness and real depth of flavor. The sour of the cream cheese complimented the buttery caramel. The graham cracker was a nice balance to the sugar and vanilla. I think with a little more experimentation and refinement of the various steps, the caramel flavor could give the whole cake a roasted, smoky flavor that would really bring it all together.
My mom asked me how many Weight Watchers points each slice of this little doozy was and I just laughed at her. Honestly, folks, I didn't even bother to figure it out. This is just one of those occasions when you just need to relax and be a glut without guilt. Having said this, I do have a few ideas for making this cake a bit more waist-friendly (see below).
Some thoughts for improvements and future variations:
- My caramel ended up with little chunks of sugar suspended in it. They weren't rock hard, didn't pose a threat to any one's dental work, and we didn't even notice them once I added the pecans, but the perfectionist in me was disgruntled. My suspicion is that I didn't stir the butter and sugar as thoroughly as I should have (I was in a bit of a rush seeing as how the Engineer's mother was arriving in about ten minutes). I've done a bit of research on the properties of sugars and making caramel sauce since making this recipe and have decided that, as you might suspect, making caramel is a bit more tricky than this recipe would lead a gal to believe. I'm actually really intrigued by the whole process since it has to do with chemical reactions on the molecular level and all sorts of science-experiment type things. I'm planning to do some more research and experimentation, and will be sure to share my findings with y'all!
- Another caramel note: I was happy with the final flavor--it really did taste like caramel!--but I think it could have had more depth. As my pal Harold McGee says in his book On Food and Cooking, "The aroma of a simple caramelized sugar has several different notes, among them buttery and milky, fruity, flowery, sweet, rum-like, and roasted. As the reactions proceed, the taste of the mixture becomes less sweet as more of the original sugar is destroyed, with more pronounced acidity and eventually bitterness and an irritating, burning sensation." Thanks, Harold! Since my caramel could definitely be described as "buttery and milky," my suspicion is that I could have let the syrup boil for a little while longer to deepen the flavor before adding the butter and taking it off the heat.
- I love pecans, but I'm not sure they really added very much here. The Engineer suggested briefly dry-frying or roasting the pecans before adding them to the cake. This is something that is often suggested in other recipes I've come across in order to activate the oils in the nut and enhance the overall flavor. I also think that roasting the pecans would bring out similar flavors in the caramel.
- I also wondered about doing away with the pecans all together and instead sprinkling roughly crumbled graham crackers on the top. This would add a bit more crunch and bite in the mouth, would mirror the graham cracker crust (of course), and would also reduce the number of ingredients competing for precedence in your mouth. The taste of the cheesecake and caramel is complex enough, and unless the pecans are really enhancing the flavor in those components, I think they're just distracting. Again, I think graham crackers could compliment the flavors just as well if not better.
- I am curious to make a lower-fat version of this cheesecake. A recipe for New York Cheesecake in The Best Light Recipes by Cook's Illustrated suggests replacing the cream cheese with a combination of light cream cheese, drained cottage cheese, and drained low-fat yogurt. The recipe is described as definitely tasting different than regular cheesecake, but just as excellent on its own merit. I've tried several recipes from this book and have been well pleased with many of the recipes, which don't just rely on using the "Low Fat" version of a full-fat product. Worth a try anyways.
- It would also be fun to experiment with different flavors in the caramel. This could be done by either infusing the syrup while it's melting or by adding flavors to the final caramel as it's cooling. Cook's Illustrated has several mouth-watering suggestions: Orange-Espresso Caramel Sauce, Coconut Ginger Caramel Sauce, and Dark Rum Caramel Sauce, to name a few.
- I think that this recipe could translate really well into a finger-food, buffet-table item. My thought is to make the cheesecake as normal, but then cut out mini-cheesecakes (either in square or in circles using a biscuit cutter) that would be about an inch or so across--small enough to be eaten in one single bite. Then use a chopstick or other poking-device to dowel a little hole in the top of the cake. Fill the hole with caramel and top with one whole pecan or a fragment of graham cracker.
- Another serving option would be to make several mini-cakes in individually-portioned ramekins. This would be fun for a dinner party and would be a bit more elegant than cutting slices of cheesecake.
-----
Pecan and Salt Caramel Cheesecake
Adapted from Chow.com
Crust:
1 1/4 c. graham cracker crumbs (5-6 graham cracker rectangles)
4 tbsp (1/2 stick) unsalted butter--at room temperature
3 tbsp granulated sugar
Cheesecake:
2 lbs (4 8-oz packages) cream cheese--at room temperature
1 c. granulated sugar
1 large egg yoke--at room temperature
3 whole eggs--at room temperature
1 tsp vanilla extract
Caramel Topping:
1 c. granulated sugar
4 tbsp (1/2 stick) unsalted butter--at room temperature
1/2 c. heavy cream--at room temperature
1 c. roughly chopped pecans
1 large pinch sea salt
To begin:
Place all ingredients (included refrigerated ingredients) on workspace. Allow refrigerated ingredients to come to room temperature. The butter should be soft and malleable. Eggs can also be placed in a bowl of hot water to bring them to room temperature.
Preheat oven to 350 degrees.
To make the crust:
To make graham cracker crumbs, break several squares of graham crackers into rough pieces in a bowl. Use the bottom of a cup or a pestle to grind the crackers into uniform-sized crumbs. This was one of the most satisfying parts of the process--I may start crumbling graham crackers for stress relief. Mix sugar into the crumbs. Mix in the butter with your hands, squeezing gobs of butter together with the crumbs with your fingers, until thoroughly combined. Press into the bottom of a 9- to 10-inch spring form pan. (If you don't have a spring form pan and want to make this cake in a regular pie dish, make sure to use a deep dish pan at least 2.5 inches deep. There's lots of toppings that go on this and the cheesecake with rise quite a bit in the oven!)
To make the cheesecake:
In the bowl of a stand mixer (or medium-sized bowl if using hand mixers), roughly combine sugar and cream cheese with a spoon. Once the sugar is adhered to the cream cheese, beat with a mixer until light and smooth--about the consistency of ganache frosting. Add the eggs one at a time, mixing until the egg is completely blended in (but be careful of over-mixing; the egg should just be barely blended so you can no longer see strings of the yellow yoke). Add vanilla extract and mix.
Pour mixture into the spring form pan on top of the graham cracker crust. Bake until a toothpick or a cake tester comes out clean and the center is set. The Chow.com instructions say this will take about 40 minutes, but mine ended up taking about 55 minutes, so just monitor your cake carefully. It will rise significantly in the pan and turn a deep golden color around the edges. It will also likely crack along the top--this is not so desirable in normal cheesecake, but fine for this one--just more nooks and crannies for the caramel!
Let the cheesecake cool completely on a cooling rack with the spring form still attached to the base. As it cools, the cheesecake will sink a bit into itself. Ultimately, the sides will be sloped slightly higher than the middle.
For the caramel:
Combine the sugar and 1 tablespoon of water in a small saucepan and stir until you make a thick sugar paste. Place over medium-high heat and bring to a boil. At this point, the Chow.com recipe says to allow the mixture to boil until it is amber in color. While this is true, I think it's a bit misleading about what you should expect.

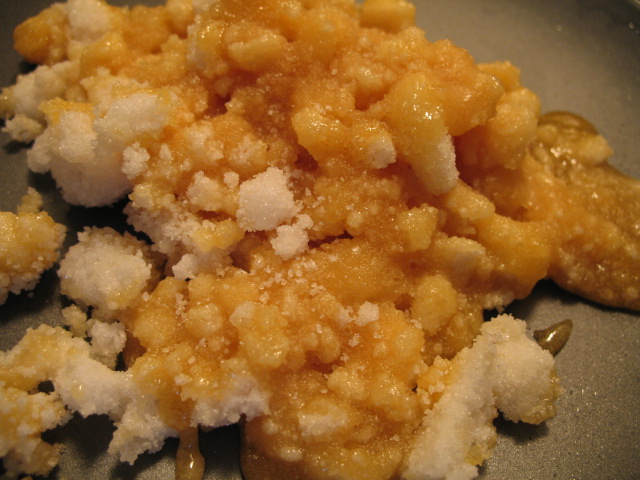
 In this first picture (left), the sugar/water paste has just come to a boil. It looks a bit shiny, but is still a grey color. This will boil furiously for a few minutes without changing color and the boiling will slowly begin to stop. In my first batch of caramel, I kinda panicked at this point and assumed that I had done something wrong since it wasn't changing colors. I stirred it a bit, and the mixture started to reform itself into granules of sugar (the middle image). I waited for a while longer and noticed that the sugar on the bottom was melting again, and the re-melted sugar was indeed turning an amber color. However, the sugar was really clumping together and looking more like rock candy than sauce, so I dumped it into a pan to cool (far right picture) and started over again.
My recommendation is DON'T STIR the mixture--a crust will form on the top and you'll see it pushing and dipping here and there as the sugar melts into a liquid again. Eventually (in about 5 minutes or so), the crust will melt as well and you can stir it a bit. I wasn't sure exactly what constituted an 'amber' color, so I erred on the side of caution and called it good when the sugar was about the color of browned butter.
Add the butter to the pan, and be careful because the mixture will pop and bubble and generally behave like a spoiled brat of a sauce. Stir until the butter is completely combined with the sugar. Remove from heat and add the cream in two batches. Again, the mixture will boil and bubble, toil
 and trouble, for a bit. Keep stirring until everything is well combined and the caramel is a milky tan color. As you stir and the sauce cools, it will thicken slightly into a more familiar caramel consistency. The milk and butter also stabilizes the caramel, so it won't harden into rock-candy and will stay a thick syrup.
When the caramel has cooled to room temperature (you should be able to dip your finger in for a taste test), pour it over the cheese cake. Sprinkle a few pinches of sea salt over the top and then sprinkle on the pecans.
 Once the bottom of the pan is cool enough that you can touch it with your bare hands, cover and let the entire cake cool in the fridge. The longer it sits, the more the caramel will absorb into the nooks and crannies of the cheesecake. If you like this effect, let it sit for a few hours (for instance, while you're eating turkey n' stuffing). If you like your cake pristine and the layers separated, serve it a bit sooner.