skip to main |
skip to sidebar
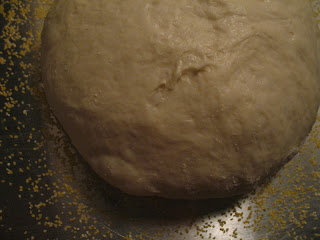
 If you've ever wondered what happens if you forget to slash the top of your bread, this is it. Hard to tell if the loaf is eating itself or giving birth to a Brave New Loaf. Either way, it ain't pretty.
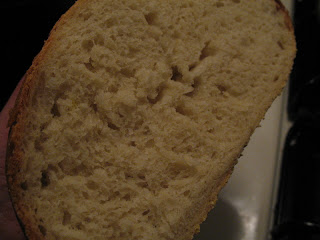
But golly GEE, it tastes good! This is the second loaf from the Simple Crispy Bread recipe I made last Thursday, baked after lazing about (I mean, fermenting) in the fridge for three days. The taste was much the same (yeasty and salty--in a good way), but the crumb and texture were very different. In the first loaf, the crumb was pretty tight with a lot of small, evenly distributed holes. In the second loaf, the crumb was looser with some bigger holes here and there, much more like a traditional hearth loaf. The texture was also very chewy and airy--a seeming contradiction in terms, but actually so delicious and adept at holding pockets of melted butter that we ate the entire loaf before I thought to take a picture to show you one of the slices. Oops!
 This past Thursday, I left my cube to get something at the printer and by the time I walked back (muttering to myself because I'd ALREADY found a typo I'd have to fix), the sky out the window was full of thick, fat flakes. Our offices closed about an hour after that. I was supposed to have class later, but honestly? I just wasn't feelin' it. What I WAS feelin' was going home, curling up on the couch with some knitting and watching the season premiere of "Crowned" taped the night before. And so I sat at my computer in my empty office pressing the refresh button on my internet browser until ("C'mon! C'mon!") the note went up on the school website that classes were canceled. YES! Three full trains passed through the station before one came with enough space for me to smoosh myself, my two bags of shtuff, and my equipment roll into the crevice between the first step and the door. Two hours later, I finally got off the train and forged the last stretch of the journey on foot because I could walk faster than the traffic. It was cumbersome with the bags, but I actually think they made good ballast to keep me afloat in the snow. And though I managed to keep my footing the whole way, I like to think they would have cushioned my fall. Except for my equipment roll. That would have...yeah, not the equipment roll.So after I thawed out with a glass of wine and some mother-daughter pageant action, what did I do with my evening off from baking class? Why, I BAKED of course! I mean DUH! What ELSE would I be doing with a night off from school?!Ahem.I first saw this recipe for "Simple Crusty Bread" in the New York Times a few weeks ago. It pledged to be an alternative to the No-Knead Bread of recent fame, but even simpler! quicker! and more flavorful! It was this last promise that really caught my eye since, for me, the lackluster flavor of the No-Knead Bread outweighed it's convenience. I was also intrigued by the fact that one recipe made four loaves and the dough would keep in the fridge for up to two weeks, allowing you to lob off a piece whenever the mood struck. In general a slow rise will give you a more complex flavor and better texture, and a 'retarded' or 'delayed fermentation' rise in the fridge will result in a slightly sweet bread, like the slackdough breads I was working on a few summers ago--HERE. I baked off one loaf right away and stored the other three in the fridge for taste-tests over the next few weeks.
 Dough just after combining ingredients
 The dough after the 2-hour rise
 Shaped loaf
 This is what the underside of the loaf looks like after you stretch the top
~~~~~~
Lazy Girl's Loaf (a.k.a. Simple Crusty Bread)Recipe alone: http://www.nytimes.com/2007/11/21/dining/211brex.htmlFull article: http://query.nytimes.com/gst/fullpage.html?res=9C0DEEDB153FF932A15752C1A9619C8B63
Adapted from "Artisan Bread in Five Minutes a Day," by Jeff Hertzbergand Zoë François (Thomas Dunne Books, 2007)Time: About 45 minutes plus about 3 hours' resting and rising1 1/2 tablespoons yeast1 1/2 tablespoons kosher salt (If you don't like salty, try cutting this down to 1 Tablespoon)6 1/2 cups unbleached, all-purpose flour, more for dusting doughCornmeal.1. In a large bowl or plastic container, mix yeast and salt into 3cups lukewarm water (about 100 degrees). Stir in flour, mixing untilthere are no dry patches. Dough will be quite loose. Cover, but notwith an airtight lid. Let dough rise at room temperature 2 hours (orup to 5 hours).2. Bake at this point or refrigerate, covered, for as long as twoweeks. When ready to bake, sprinkle a little flour on dough and cutoff a grapefruit-size piece with serrated knife. Turn dough in handsto lightly stretch surface, creating a rounded top and a lumpy bottom.Put dough on pizza peel sprinkled with cornmeal; let rest 40 minutes.Repeat with remaining dough or refrigerate it.3. Place broiler pan on bottom of oven. Place baking stone on middlerack and turn oven to 450 degrees; heat stone at that temperature for20 minutes.4. Dust dough with flour, slash top with serrated or very sharp knifethree times. Slide onto stone. Pour one cup hot water into broiler panand shut oven quickly to trap steam. Bake until well browned, about 30minutes. Cool completely.Yield: 4 loaves.Variation: If not using stone, stretch rounded dough into oval andplace in a greased, nonstick loaf pan. Let rest 40 minutes if fresh,an extra hour if refrigerated. Heat oven to 450 degrees for 5 minutes.Place pan on middle rack.
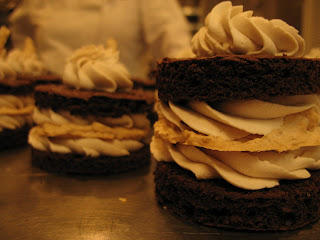 I haven't thought of a good name for these puppies yet. Can't quite figure out a name grand enough, nuanced enough to appropriately describe these layers of chocolate genoise, pomegranate whipped cream, and hazelnut dacquoise. Oh, man, they were tasty!Hazelnut dacquoise, for those who don't know, is a basic meringue (egg whites beaten with sugar) with ground hazelnuts mixed in. I spread them into little rounds to form the flat 'cookies' sandwiched between the whipped cream. I had...oh...two trays or so of cookies left over and may have (MAY have) personally eaten the majority of them.Any brilliant names come to mind?!
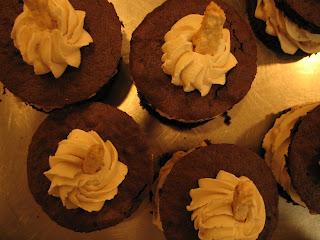
 These bite-sized souffles have been one of my favorite things that I've made so far in culinary school. The base is a thin fillet of sole coiled into a ring and tied with a thin strip of blanched scallion. Around this, we wrapped a "collar" of aluminum foil and spooned the Parmesan souffle on top of the sole. (The collar is used to support the souffle as it rises and is removed right before serving.)
These little guys are fantastically light. The texture of the flaky sole and the creamy souffle play off each other nicely, and the hint of Parmesan brings out the flavor of the sole. In my humble opinion, of course.
 If you've ever wondered what happens if you forget to slash the top of your bread, this is it. Hard to tell if the loaf is eating itself or giving birth to a Brave New Loaf. Either way, it ain't pretty.


