skip to main |
skip to sidebar
 I had some leftover brisket wallowing in my fridge on last week and got it in my head to make some mini-calzones over the weekend. I thought I'd add some caramelized onions and roasted red peppers, but got stumped on the cheese. I stood in front of the cheese fridge at Trader Joe's for at least fifteen minutes picking up one cheese and then another, squinting my eyes and tasting various imaginary flavor combinations in my mouth. Goat cheese? No.... Sharp cheddar? Possibly... Maybe with some BBQ sauce? Sigh.... And then my hand wavered over some smoked gouda. I can't remember the last time I had gouda. No reason, really, I just...haven't.
And standing there imaging how gouda would taste with my smoky brisket etc. etc., I remembered my dad coming home from work with a shopping bag, all excited and jittery as he pulled out a round of smoked gouda and some tart apples. I was probably fourteen or fifteen at the time, and I just remember how happy he was as he cut up the wedges of apples and arranged them around some slices of gouda. "Here," he said, pushing the plate toward me, "Try this!" And with a fair bit of curious trepidation (likely disguised as teenage sass), I mirrored him as he took a slice of apple and layered on a slice of gouda. I bit off a corner and oh my! Good stuff!
I think this was the first time that I realized that cheese could be something other than what was sprinkled over pasta. It could be something more. It could transform my quiet, reserved father into a euphoric, cheese-pushing gourmand. That's some powerful stuff, right there.
And that's how I ended up with smoked gouda in my calzones. Not precisely a 'traditional' filling for calzones, true, but then I've never exactly been one to stand on formalities. I think my calzones and I will be juuuust fine.
I started making these mini-calzones a while back as part of my open-ended quest to find healthy, better-tasting, freezable, and easily-transportable lunch alternatives instead of things like Hot Pockets, Cup-o-Noodles, Lean Cuisines, and their ilk. It took a while to find a crust that fit the 'healthy' profile, until it dawned on me (like a skillet to the forehead) to use my thin-crust pizza recipe. Duh. That dough is perfect for this--thin, but chewy; easy to make and healthy to boot; just enough flavor to give you a nice bread-y background but not so much that it steals the show. Splitting the dough into eight portions seems to give just the right amount of dough for a six-inch calzone. Poi-fect.
The combinations for fillings are really endless. I usually do a medley of meat, cheese, and sauteed veggies--whatever I have on hand. Keep in mind that they are mini-calzones, after all, so there's a limit to what you can stuff in them. I usually weigh out a half-ounce of meat, a half-ounce of cheese, and then layer on as many veggies as I think will fit. Some combos I've done in the past are spicy pulled pork/goat cheese/caramelized onions and red peppers, sausage/cheddar/veggies, eggplant/kalamata olives/feta. You can also throw in a sauce of your choice--BBQ sauce works really well and a dab of tomato sauce is never out of place. Obviously, these calzones can be entirely vegetarian--even vegan, since the crust doesn't have any dairy! Woot!
The only drawback is that these are pretty labor-intensive to make, so I usually set aside an afternoon, make a double-batch of dough and keep on trucking until my fillings run out. I have found that it helps to lay out little piles of fillings in a row so you can just scoop and fold, scoop and fold.
Once they're cool, I wrap them up in saran wrap and throw them in a zip-lock bag in the freezer. A few minutes in the microwave gets the cheese melty and all the insides piping hot.
~~~
Mini-Calzones
(makes 8 with one batch of dough)
1 batch of thin-crust pizza dough (Recipe HERE)
4 ounces of cooked meat, separated into 8 half-ounce piles
4 ounces of cheese, separated into 8 half-ounce piles
sauteed veggies of your choice (onions, green or red peppers, eggplant, zucchini, mushrooms, etc.)
Pre-heat oven to 475-degrees F.
If you haven't already done so, cook your meat and set it aside to cool. Then sautee your veggies in a little olive oil until they are mostly cooked through and set them aside to cool. It's important to cook these ahead of time because they won't cook all the way through in the oven. Also, if you add the veggies raw, they will likely release a lot of liquid in the oven and you'll get mushy calzones.
Find a bowl in your kitchen that is about 6 inches across (in diameter). Use this bowl as a guide to trace 8 circles onto parchment paper. Cut the parchment into 8 pieces with once circle on each piece of parchment. Flip the parchment upside down so the actual pencil/pen mark of the circle is against the counter and your food-surface is clean.
Cut the pizza dough into 8 equal pieces. Place one piece on a piece of parchment paper in the middle of the circle. Press down on the center of the dough and then use the heel of your hand to gently push outward on all sides until you've filled the circle. The dough will be about 1/8 inch thick. Repeat with the remaining pieces of dough and parchment.
 Cover each rolled-out circle as you finished with saran wrap or an upside down bowl to keep it from drying out while you finish the rest of the circles.
Place the meat and cheese in the center of the dough and layer on as many veggies as you think will fit (you'll get a feel for it after making one or two). Leave about 3/4 - 1 inch of space around the edge. Lift one side of the dough over onto itself and pinch the dough together in the middle. Pinch all the dough to one side closed and then go back and pinch the other side closed, forming a half-moon. I find it easiest to do this if I pick up the calzone and hold it upright in my left hand like a taco, and then I use the fingers of my right hand to pinch the rest of the dough closed. You can poke any errant bits of filling back inside. Repeat with remaining calzones. (Note--the parchment paper will continue sticking to the dough and that's fine! When the calzone bakes, the parchment will gradually un-stick itself.)
 Arrange as many calzones as will fit on a sheet pan. Just before baking, use a paring knife to cut three steam vents in the top of the calzone--go right through the parchment paper. Bake the calzones for five minutes and then flip them over. Bake for another 5 minutes and flip them over again. Bake for another 3-5 minutes until the calzones are golden and browned in spots. This whole baking process takes about 15 minutes in my oven, but it may take shorter or longer in yours. Since the filling is already cooked, you're really just looking for the crust to be a nice browned color. If the edges start to char, that's a sign that they're likely done cooking.
Remove calzones to a cooling rack and bake off any remaining calzones. Once they're completely cool, wrap each calzone in plastic wrap and keep them in a ziplock bag in the freezer. They'll last in there for a few months (if you don't manage to eat them all first...)
I don't get too worried about the calzones splitting open, honestly. These are more functional than beautiful and I'm usually the only customer I have to please! Once they're cool, I tuck any tumbling bits of filling back into the shell and wrap it all up in saran wrap so it's a tidy package for grabbing in the morning and sticking in my lunch bag.
Re-heat for 1-3 minutes on High. I've also eaten them cold (like cold pizza) if they've been thawing in the office fridge for a few hours.
For interested parties and Weight-Watchers folks: The calzone shell alone is 2 points. A half-ounce (14 g) of meat is usually 1-2 points, and a half-ounce (14 g) of cheese is also usually 1-2 points. If I only use a dab of olive oil for the veggies, I usually count them as zero points. So! One calzone is usually 4-6 points or so. Not too shabby for a meal-on-the-go!

 If you've ever wondered what happens if you forget to slash the top of your bread, this is it. Hard to tell if the loaf is eating itself or giving birth to a Brave New Loaf. Either way, it ain't pretty.
But golly GEE, it tastes good! This is the second loaf from the Simple Crispy Bread recipe I made last Thursday, baked after lazing about (I mean, fermenting) in the fridge for three days. The taste was much the same (yeasty and salty--in a good way), but the crumb and texture were very different. In the first loaf, the crumb was pretty tight with a lot of small, evenly distributed holes. In the second loaf, the crumb was looser with some bigger holes here and there, much more like a traditional hearth loaf. The texture was also very chewy and airy--a seeming contradiction in terms, but actually so delicious and adept at holding pockets of melted butter that we ate the entire loaf before I thought to take a picture to show you one of the slices. Oops!
 This past Thursday, I left my cube to get something at the printer and by the time I walked back (muttering to myself because I'd ALREADY found a typo I'd have to fix), the sky out the window was full of thick, fat flakes. Our offices closed about an hour after that. I was supposed to have class later, but honestly? I just wasn't feelin' it. What I WAS feelin' was going home, curling up on the couch with some knitting and watching the season premiere of "Crowned" taped the night before. And so I sat at my computer in my empty office pressing the refresh button on my internet browser until ("C'mon! C'mon!") the note went up on the school website that classes were canceled. YES! Three full trains passed through the station before one came with enough space for me to smoosh myself, my two bags of shtuff, and my equipment roll into the crevice between the first step and the door. Two hours later, I finally got off the train and forged the last stretch of the journey on foot because I could walk faster than the traffic. It was cumbersome with the bags, but I actually think they made good ballast to keep me afloat in the snow. And though I managed to keep my footing the whole way, I like to think they would have cushioned my fall. Except for my equipment roll. That would have...yeah, not the equipment roll.So after I thawed out with a glass of wine and some mother-daughter pageant action, what did I do with my evening off from baking class? Why, I BAKED of course! I mean DUH! What ELSE would I be doing with a night off from school?!Ahem.I first saw this recipe for "Simple Crusty Bread" in the New York Times a few weeks ago. It pledged to be an alternative to the No-Knead Bread of recent fame, but even simpler! quicker! and more flavorful! It was this last promise that really caught my eye since, for me, the lackluster flavor of the No-Knead Bread outweighed it's convenience. I was also intrigued by the fact that one recipe made four loaves and the dough would keep in the fridge for up to two weeks, allowing you to lob off a piece whenever the mood struck. In general a slow rise will give you a more complex flavor and better texture, and a 'retarded' or 'delayed fermentation' rise in the fridge will result in a slightly sweet bread, like the slackdough breads I was working on a few summers ago--HERE. I baked off one loaf right away and stored the other three in the fridge for taste-tests over the next few weeks.
 Dough just after combining ingredients
 The dough after the 2-hour rise
 Shaped loaf
 This is what the underside of the loaf looks like after you stretch the top
~~~~~~
Lazy Girl's Loaf (a.k.a. Simple Crusty Bread)Recipe alone: http://www.nytimes.com/2007/11/21/dining/211brex.htmlFull article: http://query.nytimes.com/gst/fullpage.html?res=9C0DEEDB153FF932A15752C1A9619C8B63
Adapted from "Artisan Bread in Five Minutes a Day," by Jeff Hertzbergand Zoë François (Thomas Dunne Books, 2007)Time: About 45 minutes plus about 3 hours' resting and rising1 1/2 tablespoons yeast1 1/2 tablespoons kosher salt (If you don't like salty, try cutting this down to 1 Tablespoon)6 1/2 cups unbleached, all-purpose flour, more for dusting doughCornmeal.1. In a large bowl or plastic container, mix yeast and salt into 3cups lukewarm water (about 100 degrees). Stir in flour, mixing untilthere are no dry patches. Dough will be quite loose. Cover, but notwith an airtight lid. Let dough rise at room temperature 2 hours (orup to 5 hours).2. Bake at this point or refrigerate, covered, for as long as twoweeks. When ready to bake, sprinkle a little flour on dough and cutoff a grapefruit-size piece with serrated knife. Turn dough in handsto lightly stretch surface, creating a rounded top and a lumpy bottom.Put dough on pizza peel sprinkled with cornmeal; let rest 40 minutes.Repeat with remaining dough or refrigerate it.3. Place broiler pan on bottom of oven. Place baking stone on middlerack and turn oven to 450 degrees; heat stone at that temperature for20 minutes.4. Dust dough with flour, slash top with serrated or very sharp knifethree times. Slide onto stone. Pour one cup hot water into broiler panand shut oven quickly to trap steam. Bake until well browned, about 30minutes. Cool completely.Yield: 4 loaves.Variation: If not using stone, stretch rounded dough into oval andplace in a greased, nonstick loaf pan. Let rest 40 minutes if fresh,an extra hour if refrigerated. Heat oven to 450 degrees for 5 minutes.Place pan on middle rack.

 Hmm....apparently this whole idea of blogging my experience of being in culinary school is....not so much happening. Oh, I mean, I'm experiencing all right. I'm experiencing all kinds of crazy, bizarre, blog-worthy happenings. But somehow, the part where it actually gets, you know, posted to my blog? Hmm, not happening. Or at least not happening quite as frequently as I oh-so enthusiastically imagined back when I still did things like go to bed before midnight and had pass-times other than cooking. Funny, huh? (For purposes of full disclosure, this fantasy of having all sorts of time for blogging was usually followed by a day dream of being 'found' by someone begging me to write a witty-yet-touching book about my harrowing adventures in culinary school.)
Anywho, I might not be writing very much, but I'm certainly taking tons of photos. Yup, a whole backlog of awesome food shots and chefs-in-training and things on fire (oh yeah!). So I'm thinking that I'm going to start posting a weekly photo or three, just to keep y'all in the loop. I'll let you know when the talent agent starts begging me to be the next Super Star Food Photo Journalist, kay?
And so, without further ado, here is your photo of the day: Gateaux St. Honore. It's a pretty shmancy little number. The base is pate sucre (a.k.a. sweet pie crust). On top of the pie crust is a hollow ring of puff pastry, with several cream puffs strategically perched for an extra dose of decadence. The center of the ring and the cream puffs are filled with pastry cream--in this particular case, a pistachio pastry cream that was so wonderfully creamy and so astoundingly pistachio-y that I could have brushed my teeth with it every day, to hell with cavities. The ring is glued to the pie crust with caramelized sugar and then the puffs are glued to the ring the same way. We used the excess sugar to make the cage in the center of the cake and the decorations for the cream puffs.
The cage and decorations are one of those oh la la! things that are actually super easy to make (shhhh....don't tell!) For the cage, we sprayed the underside of a soup ladle with non-stick cooking spray, then dipped a spoon in the sugar, and gently shook thin ribbons of the sugar over the ladle. You let the ladle cool and then gently ease off the cage. For the decorations, we shook designs onto parchment paper. When the sugar cools and hardens, you can unpeel the parchment paper and...oh la la! shmancy decorations! Easy peasy!
The key in all of this is working with the sugar when it's still warm, but not too hot and not too cool. If you dip a spoon into the pot and shake ribbons over the sugar, the ribbons should hold for just a second before melting back into the sugar. If you don't get ribbons at all, it's too hot. If the ribbons hold for too long, your sugar is probably almost too cool to work with. Once the sugar cools, it hardens into a big mass of teeth-cracking caramel that doesn't re-heat very well.
Ok, just one more picture:  Oh, pistachio pastry cream. I do love you. [drool drool drool]
Another quickie post here--I'm on vacation next week and am planning on spending some good quality time with my blog. I think I've got about 10 book reviews to catch up on...Just had to dish (pun intended, ouch!) about the pizza I made last night, hailed by such fastidious food critics as My Boyfriend the Engineer as "your best pizza yet!" We had some bacon left over from BLTs the other night, so I chopped up a couple strips, added caramelized onions, and put a bit of BBQ sauce in with the crushed tomatoes. So very yum:Pizza Dough:1/2 Thin Crust Pizza Dough Recipe (see this previous post)Sauce: 4-5 hearty spoonfuls of crushed tomatoes2 tablespoons BBQ sauceTopping:4-6 strips bacon, cooked crispy and chopped into chunks (Pancetta would also make a classy substitute)1/2 onion, cut into strips, sauteed, and caramelized for about 10 minutes~28-42 grams (a decent handful) of shredded cheese (I used Sargento's Reduced-Fat Mexican Cheese mix)handful of fresh arugula (optional--I put this on my half; the Engineer wanted "no green stuff")Preheat oven to 500 degrees.Roll pizza dough out onto a piece of parchment paper to desired thickness. Spread crushed tomatoes and BBQ sauce onto dough. Top with bacon and onions.Bake for 5 minutes. Rotate and bake for another 3 minutes. Remove from oven and sprinkle on cheese and arugula. Return to oven for another 2-3 minutes until the crust is golden brown and crackly around the edges.Allow to cool for about 5 minutes, if you can wait that long. Cut into quarters and consume with gusto.
 It's taken a year of research and experimentation, but I think I've finally discovered my solution to bread baking on hot, humid summer days. This recipe is a step up from the No-Knead Bread of recent fame, and I find that the flavor and crumb of this loaf is a vast improvement over that recipe.
And P.S. the man-hands in the pictures below belong to my dad. I'm thinking he has a possible future in the field of professional hand-modeling.Baguette-Style Loafthanks to James McGuire, as published in The Art of Eating, No. 73 + 74
Ingredients:
500 gr all-purpose flour10 gr (1 1/2 tsp) fine salt (preferably kosher)2 gr (1/8 tsp, or about a pinch) yeast400 ml (1 5/8 c) water
Blend flour and salt in a bowl and form a well in the center. Pour the water into the well and sprinkle the yeast on top. Allow the yeast to dissolve (about 5 minutes). Using your fingertips, gradually begin to mix the flour into the water until all the flour is incorporated. This should take about two minutes. Cover the bowl and let rest for 10 minutes.

 When the ten minutes is up, give the dough its first fold. Slip your fingers between the side of the bowl and the dough. Grasp the dough between your fingers and thumb, lift the flap upwards to about the rim of the bowl, and then lay the flap across the top of the dough. Give the bowl a turn and repeat the folding until you have gone a full revolution--about 8 to 10 folds. Cover and let rest for 1 hour.
 After an hour, give the dough a second set of folds. Cover and let rest 1 hour.
 After two hours, give the dough a third set of folds. Cover and let rest 1 hour.
After three hours, give the dough a fourth set of folds. Cover and let rest 1 hour.
After four hours, give the dough a final set of folds.


 At this point, the dough should largely come away from the sides of the bowl when you're doing this and the dough should hold a roughly spherical shape. Sprinkle a little flour between the dough and the sides of the bowl and turn the dough out onto a floured work surface (so the folds are now underneath). Dust the dough lightly with flour and cover with the inverted bowl. Let rest 20 minutes.While the dough is resting, prepare a rising bowl or basket.
  If you have an actual rising bowl or basket, pat a little bit of flour into the sides and use that. If you're improvising, find a circular bowl or basket about the diameter of the dough and line it with a clean, smooth kitchen towel (not terry cloth or anything with a nap).
After 20 minutes, pick the dough up and gently reshape it into a sphere by tucking the ends under. Invert it into the rising basket so the folds are on top. Cover with plastic wrap or a towl and let it rise at room temperature for 45 - 50 minutes.  The loaf has sufficiently risen when a fingertip indention disappears completely in 2-3 seconds. If it springs back like a rubber ball, it's not ready; if the indention remains, it's risen for too long and your loaf will still be yummy, but won't rise as much in the oven. After the dough has been rising for a half an hour, place a baking stone in your oven and pre-heat the oven to 450-degrees.*
When the dough is ready, sprinkle a pizza peel with a light layer of cornmeal (or the back of a cookie sheet will do) and tip the dough onto it. Quickly cut a few scores into the surface of the dough--about a half-inch deep--with a razor blade. Slide the dough into the oven onto the baking stone. Using a spray bottle, spritz the inside of the oven (avoiding the light) and the surface of the dough and quickly close the door. Repeat this a few times in the first five minutes of baking.
When the loaf begins to color (after about 15 minutes), turn the oven down to 350-degrees. Also, rotate the loaf every 15 minutes so that it bakes evenly (most oven have 'hot spots' that can cause un-even baking). After 45 minutes, start checking for doneness. If you thump the bottom of the loaf with your  thumb, it will sound hollow--like you're knocking on a door. The surface should be a caramelly-color with spots of darker toast color. The internal temperature should be about 210-degrees.
 Allow to cool for 20 minutes. Serve with room-temperature butter sprinkled with sea salt and a few dollops of good honey.*You can also bake this in a dutch oven, a la 'No-Knead Bread.' Just place your dutch oven inside the oven so both pre-heat at the same time. When it comes time to bake, tip th e dough into the dutch oven and cover with lid. Let it bake for about 30 minutes with the lid on and finish with the lid off.
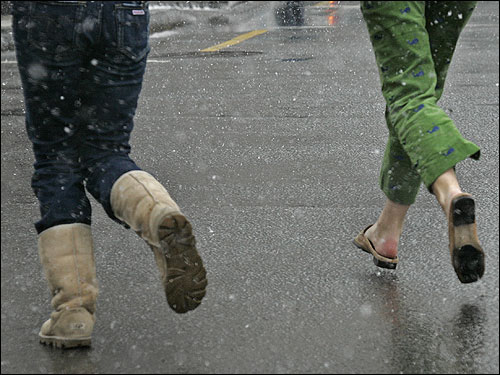
 Since I didn't manage to extract myself from the cozy, multi-blanketed nest of my bed until well after the snow had passed from pristine prettiness into half-melty sludge, I give you this picture from Boston.com taken yesterday afternoon. Besides being yet another beautiful example of the fashion faux pas and arch-collapsing train wreck that is the Ugg boot (oh, why do I torture myself?), this photo so perfectly captures how unwilling we Bostonians were to deal with snow after a week of 55-degree weather--much less the blizzardy ice storm with sideways blowing snow pellets that we ended up getting. In my my three years in Boston, I can't help but notice that Bostonians have quite a time-honored "willing suspension of disbelief" going on here. To name a very few, we are willing to believe:
- That work on the Big Dig will eventually be finished.
- That if I dig my car out of the snow and leave a lawn chair on the spot with a note saying, "My Spot--Don't Take," no one will, in fact, take my spot.
- That the T runs on time, and when it doesn't, this is a completely unprecedented event.
- That Dunkin' Donuts makes the best coffee in the universe.
- That every year is "Our Year" for the Red Sox to win the World Series (And when the Red Sox really did win back in 2004, the entire city shut down for days--not because everyone was so elated that they finally won, but because literally no one knew what to do with themselves.)
- That if you let your dog poop in the un-shoveled sidewalk snow, the poop will magically have disappeared come spring when the snow melts and will not, in fact, sit in a frozen, petrified pile two inches from where I'm waiting for the bus. (I don't have a sassy web link for this one, but maybe it's better that way.)
Fuggedaboudit.
A good pummeling of snow seems to bring out the best and the worst in people. This morning, it's bringing out the best. Determined to make Irish soda bread for a St. Patty's Day party later today and lacking the proper ingredients, I cinched on my snow pants, laced up my snow boots, and prepared for the worst. But then...the worst never came! When I realized that my local CVC doesn't carry buttermilk* and realized that a bus trip to the nearest Stop&Shop would be in order, I was sure my good mood was doomed. But then, miracle of miracles, a bus appeared on the horizon mere moments after I arrived at the bust stop. In attempting to board the bus, I managed to drop my shopping list, wallet, and T-pass at the same time, thus delaying the boarding of fellow passengers and departing of the bus. I apologized profusely to the bus driver, but instead of rolling her eyes or gazing disdainfully past my left ear--a normal and accepted reaction to passenger ineptitude--she actually said (get THIS!), "No problem. Welcome aboard." No problem? Welcome aboard?! Did anyone else hear that? But no, my fellow passengers were gazing placidly out the windows, not even minding that I was (continuing) to delay the bus by standing in the doorway, immobile with disbelief.
At the grocery store a group of local firefighters all dolled up in their boots and suspenders were shopping for a St. Patrick's Day dinner together--a very meaty St. Patrick's day dinner, as became increasingly obvious as I followed them around the grocery store. (Side note: I wasn't actually "following" the firefighters in the stalking sense; our shopping routes just happened to coincide is all. Though they were pretty adorable.) There was one Papa Bear Firefighter with the cart and all the other firefighters kind of orbited around him, bringing him cuts of meat for approval, adding condiments to the cart, dropping off sodas. I was especially touched when one swarthy-looking fellow added two beautiful purple rutabagas to the mix. I loves me a veggie-eatin' firefighter! And the whole time, the group was joking with each other, teasing the Stop&Shop employees (who they seemed to know quite well), and chatting with fellow customers. They even posed for a few pictures. It was all very heartwarming.
I found all my purchases, trotted back to the bus stop, and again waited mere moments for another bus to show up. The doors slid open and who should I see but my new favorite bus driver! "Good morning," she said as I climbed up (managing not to drop anything this time). "Good morning!" I chirped in reply. When I got to my stop, I actually walked all the way to the front of the bus just so that I could say, "Thank you!" as I got off. "You're welcome," she said gravely as the doors wheezed shut behind me.
And in one last feat of snowy-day good cheer, I passed the mailman on the short walk from the bus stop to my house. I always feel bad for mail carriers on the particularly gross weather days--rain or shine, they're always out there, but they always seem quite willing and happy to be doing what they're doing. In any case, peering at me from beneath his fur-lined, US Postal Blue hat**, my mailman said, "Hello! How are you?" "Quite well, thank you! And you?" I replied. "Oh, I'm great!" he said, and slushed past me, whistling a little tune.-----
*By the by, I'm not quite sure why I thought CVS would carry buttermilk, but I rilly wanted to believe it would--ahh...there's that suspension of disbelief! Hey, I'm a real Bostonian!
**Every time I see a mail carrier now, I totally think of the Project Runway episode where they have to redesign the US Postal Service uniform. I saw a mail woman a few days ago wearing a particularly fashionable uniform (I thought) and I almost stopped and asked her about it. That was on a day when snow was making Bostonians grumpy, though, so I decided not to.-----Irish Soda Bread
I've shied away from soda bread for a long time. My memories of it are of dense, dry, crumbly bricks with little taste or satisfaction, which are left in the bread basket long after the hunks of airy baguette and elegant slices of sourdough have been claimed. In the build up to St. Patty's day, a number of recipes for soda bread--both sweet and savory--came my way and I decided to give it a whirl in my own kitchen.
I decided on a sweet bread with raisins and nutmeg and held my breath as the rocky, unappetizing balls of dough baked into golden loaves twinkling with granulated sugar. In both taste and consistency, this bread reminds me of scones. The crust is both crunchy and crumbly, with a satisfying chew. The interior was cakey and moist, rich with a light sweetness and chewy little nuggets of raisin. This cake was the perfect finish to the corned beef stew cooked by our St. Patrick's Day hostess, and was wonderful on its own, smeared with butter, or paired with the traditional sharp cheddar cheese.
In my research for this recipe, I found that soda bread is traditionally baked in a cast-iron skillet so that the top and bottom get crunchy and brown evenly while the middle stays cakey. I don't have a cast iron skillet (yet--I know, I know, it's sin that I don't have one yet), but I thought I could replicate the effect in my dutch oven. This recipe makes two loaves, so I baked one in the dutch oven and one on a regular baking sheet. (In the picture of the two loaves above, the one on the left was done in the dutch oven.)
Both loaves rose about the same amount, but the dutch oven loaf had a rounder shape and more even surface; where the loaf backed on the sheet was craggier and less uniform in shape. Additionally, the loaf baked in the dutch oven did indeed have a more even brown color and crunchier crust while the inside was noticeably more moist. The verdict? If you have a dutch oven or cast-iron skillet, I definitely recommend baking the loaf in it--just add about fifteen minutes to the baking time and remove the lid in the last five minutes. However, if you don't have a dutch oven, never fear--your bread will disappear just as fast.
Sweet Irish Soda Bread
Makes 2 loaves
4 cups flour
4 teaspoons baking powder
1 teaspoon baking soda
3/4 teaspoon salt
6 Tablespoons granulated sugar
1 teaspoon nutmeg (1 1/4 tsp if using freshly ground)
4 Tablespoons cold unsalted butter, cut into chunks
1 1/2 cups thick buttermilk
2 egg yolks
2 teaspoons vanilla
1 1/2 cups raisins (purple or golden)
Set oven to 375-degrees. If using a dutch oven or skillet, put it into the oven to warm as the oven heats.
In a large bowl, combine flour, baking powder, baking soda, salt, sugar, and nutmeg. Add the butter and use the tips of your fingers or a pastry cutter to work the butter into the flour until it reduces to pea-sized bits. Add the raisins and toss to coat with flour (this helps the raisins stay suspended in the batter).
In another bowl, whisk together the buttermilk, th egg yolks, and the vanilla. Create a well in the center of the flour mixture and pour in the liquids. Use a wooden spoon to stir the mixture until all the ingredients are combined and the dough easily comes together into a ball. It will be very moist and shaggy.
Divide the dough in half and form each half into a ball. Use a sharp paring knife to slash a cross into the top of each loaf about 1/2 inch deep, a traditional feature of soda bread that also allows the dough to expand while baking without cracking the surface. Sprinkle each loaf with a few pinches of granulated sugar.
If using a dutch oven or skillet, drop the dough (cross-side up) into the bowl and cover. If using a baking sheet, cover a baking sheet with parchment paper and set the dough in the middle. Bake loaves for 40 minutes or so until the surface is evenly golden, the center is set, and a cake tester (or toothpick) inserted into the center comes out clean. (Loaves baked in a dutch oven may need another 15 minutes to bake. Leave the oven uncovered for the last 5-10 minutes of baking.)
Allow the loaves to rest at least 1/2 hour before serving.
Weight Watcher's Points: Each loaf is about 34.5 points total. If you slice it into 12 wedges, each wedge is about 3 points a piece.

 It's a cold and dreary Saturday afternoon here in Beantown, USA--about time given all the warm weather we've been having here this winter. It seemed like a perfect opportunity to finally collect all my little recipe notes and taste-testing thoughts on my Lemon Anise Spice muffins and put everything together in proper recipe formation. Plus the deadline for the recipe contest I want to enter this into is Wednesday, but whatev.
I was hosting a Craft-ernoon at my house a while back and wanted to serve all my crafty little friends some muffins that were both familiar and a bit more...dramatic. Looking through my cupboards, cardamom immediately jumped out at me as a good pairing with the creamy flavor in basic muffins. Think chai tea with milk while lounging sumptuously on a red velvet sofa, and spicy after-dinner toddies just before you snuggle into bed. The anise was really added as an afterthought. I tasted the batter and decided it needed that something "extra," and was surprised at how the anise ended up stealing the show. A few tablespoons of lemon brought all the ingredients together (Lemon goes with poppy seeds and anise is about the same size as poppy seeds, right?).
The resulting flavor is exactly what I was going for--familiar ingredients put together in an unfamiliar combination resulting in something new. The primary flavors are lemon and anise, but that little touch of cardamom rounds out the edge and highlights the best qualities of both the lemon and the anise. The basic muffin recipe I use for this results in a denser muffin than you might be used to seeing. This makes it a perfect brunch item since the cakey fluffiness is a happy medium that both muffin and scone lovers can enjoy. Note: Other citruses would probably work equally well here--tangerine, orange, Meyer lemon...
Lemon Anise Spice Muffins
with thanks to Orangette for the basic muffin recipe HERE
Ingredients: 3 c. flour 2 1/2 tsp baking powder 1/4 tsp baking soda scant 1 tsp salt 1/2 tsp cardamom 2 Tbsp anise seed 3/4c + 1 Tbsp milk 2 Tbsp buttermilk 4 oz unsalted butter (at room temperature) 3/4 c + 1 Tbsp sugar 2 large eggs (warmed to room temperature) 2 Tbsp lemon zest (about the zest of 2 medium lemons) Note: It's important for the butter and eggs to be at room temperature. Preheat oven to 350 degrees Fahrenheit with rack on the middle position. Line a 12-cup muffin tin with muffin liners (or spray with non-stick coating). In a medium-sized bowl, whisk together flour, baking powder, baking soda, salt, cardamom, and anise. In a separate measuring cup, combine the milk and butter milk and set aside. In the bowl of a stand-mixer or using an electric hand mixer, beat the butter and sugar on medium-high speed until light and fluffy. Add the lemon zest to the butter-sugar mixture and mix until just combined. Add the eggs one at a time, beating after each addition until just combined and no trace of yolk is visible. With the mixer on low, pour in one-third of the milk mixture and then one-third of the dry ingredients. Continue to alternate between the milk and dry ingredients until all ingredients are incorporated. Your dough should look pale yellow and shaggy. Divide the batter between the twelve cups and bake until the muffins are firm to the touch and a cake-tester inserted into the center muffin comes out clean--about 25-30 minutes. The muffins are wonderful on their own, but you can also brush the tops with melted butter and press them into confectioner's sugar for an added treat.
WeightWatchers: Using 1% milk, 12 muffins is 5.5 points per muffin. These make pretty big muffins though, so you can easily make 24 muffins out of the same recipe and still have a healthy muffin to munch on. If you make 24 muffins, each muffin is about 2.75 points each.
 On Christmas Eve at the abode of Emma n' the Engineer and with many friends in attendance, a festivus was had and, yay verily yay, it was good. This was the first Big Production meal I have ever prepared, and I was a bit nervous. We're talking appetizers, side dishes, main dishes, vegetarian dishes, drinks, and (of course) dessert. With the day itself looming on the horizon, I suddenly realized that pulling this whole thing off was going to require some Planning and Preparation. My list-making, organization-obsessed, multi-tasking little heart was filled with glee. Keep in mind that this is the same little heart that spent whole afternoons as a child organizing and then reorganizing the desk in her room, and who looked forward to buying school supplies every Fall nearly as much as she looked forward to Christmas.
My good friend R. and I had a grand time coming up with the menu. After much trolling of the Internet and a smattering of ideas thrown back and forth, we decided on a Cross-Atlantic Portuguese-Brazilian Dinner. Here was our final menu (click on the name of the dish to link to the recipe):DRINKS:STARTER/SIDES:
MAIN:
- Portuguese Potato Dumpling Soup (with Kale)-- vegetarian
- Portuguese Style Poached Chicken (with Lime, Chili, and other South o' the Border Seasonings)--loosely based on THIS recipe.
DESSERTS:
Like a dufus, I had a few too many caipirinha's and "forgot" to take picture of a lot of the dishes, but here's the run down of how the food part of the night went down and a few pictures of the pictures I remembered to take.
Drinks: The caipirinhas were FIERCE. Wowzas, did they knock your socks off. It wasn't until R. was actually preparing them that we fully realized that the drink is essentially all cachaca, a Brazilian brandy made from sugar cane, with a little sugar and lime thrown in there to take the edge off. Barely. We ended up adding a good dose of Fresca (classy!) to the drinks to make them a bit more drinkable. Even so, we all agreed that caipirinhas brought back ever-so-fond memories of Spring Break beach parties.
We had the quentaos after dinner as we reclined around the living room in various states of comatose. This is a drink that I would definitely have again--the spices are very similar to mulled wine (red wine is actually an ingredient in some variations) with some of that lovely cachaca. Also like mulled wine, it's served warm and would be quite nice for a cozy winter afternoon on the couch. I imagine a mug of this would also be an excellent antidote to insomnia, or at the very least you wouldn't mind being awake at 2:00 in the morning as much after you've had a few healthy gulps.
Ironically, we ended up drinking a South African wine with dinner--Mountain River 2003 Pinotage/Shiraz, a whooping $7.99 at Trader Joe's. While I was looking for Portuguese wines, I overheard another customer asking the wine steward for recommendations for a dinner of enchiladas and other South American dishes. The wine steward recommended this wine with such a glowing review that I had to try it. The wine was a deep red and very full-bodied. It had a deep, mellow flavor with just a touch of spice that really did pair well with all the flavors in the meal, but also didn't overshadow the food. I did find one bottle of a Portuguese wine, but we didn't end up opening it at the party--did I mention that the capirinhas were FIERCE?
Starters/Sides: The green beans were nothing super special. Blanched green beans drizzled with olive oil and seasoned with garlic and coriander. The recipe says to serve these cold or room temperature after having marinated for a day, but I didn't get my act together in time and also for some reason the idea of cold green beans with this particular meal didn't feel right to me, so I served them warm. (By the way, coriander was the surprise spice of the meal for me. I've never really cooked with coriander, but really liked it in the empanadas and the soup.)
 The empanadas were a big hit. I'll do a separate post on them in another day or so and describe the whole preparation process. They're essentially little pasties or turnovers--a savory filling in a pie crust. I made them the week before the party, froze them, and then baked them right before dinner. The picture here is of an empanada right before I baked them. I really wish I'd remembered to take a picture after they came out of the oven--they were all crisp and golden, the kind of food that makes your mouth water just looking at them. The crust turned out well--nice and flaky, buttery and crisp. For the filling, I used onion, plum tomatoes, hearts of palm, corn, tomato paste, and spices (cayenne, chili powder, cumin, coriander, salt). The prep work is a lot of trouble, but it was really worth it. I think my guests and I would have been happy with just a plateful of these little empanadas!
 The broa was kind of a disappointment for me, I have to admit. It's a cornmeal bread, so I knew it would be pretty dense and probably wouldn't rise like a regular wheat loaf, but I imagined the bread to be moist, crumbly, and springy like southern-style cornbread. Instead the loaf was more like a hockey puck--dry and dense. Sliced thin and spread with butter, the bread was decent, but I was still let down. I'm not sure if I didn't something wrong or if this is just the way the bread was supposed to be. I did a lot of searching on the Internet and found lots of recipes but few descriptions of how the final loaf was supposed to look, feel, and taste. From the pictures I found, I think the loaf is supposed to be rather flat (like mine turned out) but not quite as dense. More like a country hearth loaf than corn bread. I could probably figure out a better loaf if I had the urge, but I'm not a huge fan of cornmeal, so this will probably remain an unsolved baking mystery. By the way, I have an entire loaf and a half frozen in my freezer, so if you're still curious to try this bread despite my description, let me know and the loafs are yours!
Main: Poaching chicken is my new favorite thing. I do it in my slow cooker and it comes out perfect every time. (OK, it's come out perfectly all two times that I've done it.) The meat is moist, flavored throughout, and literally falls off the bone.  For this chicken, I prepared a marinade using THIS recipe from the Boston restaurant Chez Henri, only substituting 1 tablespoon of chili powder, 1 1/2 teaspoons of salt, 1 teaspoon of garam masala, and 1/4 tsp of cayenne in place of the achiote powder. (Achiote powder is a kind of sweet South American spice similar to chili powder--I couldn't find it in bulk at our co-op and didn't want to cough up the dough to buy a whole jar at the grocery store.) Instead of roasting the chicken as in the recipe, I poached it in the slow cooker with about a half cup of chicken broth, a few shots of soy sauce, lime juice, several whole quarters of limes, and a head of garlic with the cloves separated. Mmm, mmm, good. (P.S. I'm also planning another post on poaching whole chickens, but let me know if you want more detailed instructions before then.)
The only error in my otherwise well-timed meal prep was the time I allotted for preparing the potato dumplings for the potato dumpling soup. I plum forgot how gosh-darn long it takes for large potatoes to cook through when you're boiling them. (The thirty minutes suggested in the recipe was NOT enough for my potatoes, by the by. I probably would have been better boiling them for 45 minutes or so.) By this point in the evening, our friends were starting to arrive and I was feeling a bit frazzled. I thought I could make do with slightly undercooked potatoes, but it turns out that undercooked potatoes don't mash very well or even take very kindly to being mashed at all. Ah, well. So we ended up having Portuguese Half-Pureed, Half-Chunky Potato Soup instead. And it was delicious. The broth was light, pleasantly starchy, and well-flavored with garlic, salt, and coriander. I'm used to loading my soups up with all the veggies in my fridge, so I had to really exercise restraint on this one. I stuck with my recipe and only used onions, green onions, and kale...oh, and the potatoes, of course. I've never cooked with kale before and was at first a bit intimidated by the mounds of leafy greenness taking up half my counter space. Like spinach, I stripped the leaves from the woody stalks, rolled them lengthwise a handful at a time into a long cigar-shape, and cut cross sections about an inch thick. This gives you ribbons of kale about the length of your hand and as wide as a finger. It looks like a LOT of leafy greenness, but once you submerge it in the broth, the greens wilt down into a more reasonably-sized state. I thought the kale was a bit rubbery, like seaweed, but this was not unpleasant. It was actually very satisfying to have something with a bit of chew in every bite. The bitterness of the kale also balanced well with the relative sweetness of the broth and the onions, and the whole soup was warm and filling. (In retrospect, I think I would have cut the kale into smaller, postage-stamp-sized pieces instead of the ribbons. Pieces this size would be less cumbersome when spooning the soup into your mouth.)
 Dessert: And last but not least, the custard cups. These were so good that a lot of us burned our mouths rather than wait for them to cool completely. The puff pastry made a crisp and buttery cup for the custard. (FYI, I decided to leave-off making my own puff pastry for another dining adventure, so I got a little help from my friends at Pepperidge Farm for this one.) The custard was smooth and creamy, flavored with vanilla and a hint of lemon. This was my first time making custard, and I definitely recommend THIS recipe for anyone else out there looking for something new to serve. You can also caramelize the tops under the broiler or with a brulee torch for an added bit of elegance.
Since the Engineer and I were leaving for holidays in Minnesota the day after our party, our lovely friends reaped the reward of what leftovers there were. To everyone that came to the party, we were so happy to see you and spend time with you during the holidays. And to everyone else near and far, if you ever find yourself in Boston on Christmas Eve, feel free to stop by--we'll be here cooking up something fabulous!
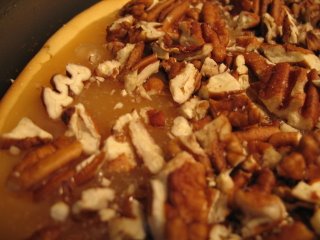 I was willing to bring any dish to Thanksgiving dinner that my host requested, but I absolutely insisted on bringing this Pecan and Salt Caramel Cheesecake. I first saw this recipe a few months ago over at Chow.com (the recipe is HERE) and immediately knew I was going to have to make it. Luckily, there was very little resistance to adding another dessert to the menu--especially one with an ingredients list like this one.
Speaking of the ingredients, my only real worry with this recipe was that it would be a complete sugar overload. I easily envision the ingredients mingling together into one uniform 'sugar!!!' instead of retaining their individual flavors. And the verdict? It's a sweet dessert to be sure, but I was surprised and pleased to taste distinct layers to the sweetness and real depth of flavor. The sour of the cream cheese complimented the buttery caramel. The graham cracker was a nice balance to the sugar and vanilla. I think with a little more experimentation and refinement of the various steps, the caramel flavor could give the whole cake a roasted, smoky flavor that would really bring it all together.
My mom asked me how many Weight Watchers points each slice of this little doozy was and I just laughed at her. Honestly, folks, I didn't even bother to figure it out. This is just one of those occasions when you just need to relax and be a glut without guilt. Having said this, I do have a few ideas for making this cake a bit more waist-friendly (see below).
Some thoughts for improvements and future variations:
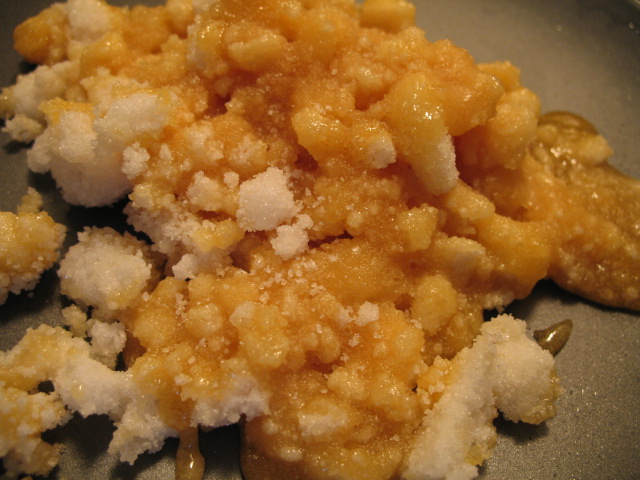
- My caramel ended up with little chunks of sugar suspended in it. They weren't rock hard, didn't pose a threat to any one's dental work, and we didn't even notice them once I added the pecans, but the perfectionist in me was disgruntled. My suspicion is that I didn't stir the butter and sugar as thoroughly as I should have (I was in a bit of a rush seeing as how the Engineer's mother was arriving in about ten minutes). I've done a bit of research on the properties of sugars and making caramel sauce since making this recipe and have decided that, as you might suspect, making caramel is a bit more tricky than this recipe would lead a gal to believe. I'm actually really intrigued by the whole process since it has to do with chemical reactions on the molecular level and all sorts of science-experiment type things. I'm planning to do some more research and experimentation, and will be sure to share my findings with y'all!
- Another caramel note: I was happy with the final flavor--it really did taste like caramel!--but I think it could have had more depth. As my pal Harold McGee says in his book On Food and Cooking, "The aroma of a simple caramelized sugar has several different notes, among them buttery and milky, fruity, flowery, sweet, rum-like, and roasted. As the reactions proceed, the taste of the mixture becomes less sweet as more of the original sugar is destroyed, with more pronounced acidity and eventually bitterness and an irritating, burning sensation." Thanks, Harold! Since my caramel could definitely be described as "buttery and milky," my suspicion is that I could have let the syrup boil for a little while longer to deepen the flavor before adding the butter and taking it off the heat.
- I love pecans, but I'm not sure they really added very much here. The Engineer suggested briefly dry-frying or roasting the pecans before adding them to the cake. This is something that is often suggested in other recipes I've come across in order to activate the oils in the nut and enhance the overall flavor. I also think that roasting the pecans would bring out similar flavors in the caramel.
- I also wondered about doing away with the pecans all together and instead sprinkling roughly crumbled graham crackers on the top. This would add a bit more crunch and bite in the mouth, would mirror the graham cracker crust (of course), and would also reduce the number of ingredients competing for precedence in your mouth. The taste of the cheesecake and caramel is complex enough, and unless the pecans are really enhancing the flavor in those components, I think they're just distracting. Again, I think graham crackers could compliment the flavors just as well if not better.
- I am curious to make a lower-fat version of this cheesecake. A recipe for New York Cheesecake in The Best Light Recipes by Cook's Illustrated suggests replacing the cream cheese with a combination of light cream cheese, drained cottage cheese, and drained low-fat yogurt. The recipe is described as definitely tasting different than regular cheesecake, but just as excellent on its own merit. I've tried several recipes from this book and have been well pleased with many of the recipes, which don't just rely on using the "Low Fat" version of a full-fat product. Worth a try anyways.
- It would also be fun to experiment with different flavors in the caramel. This could be done by either infusing the syrup while it's melting or by adding flavors to the final caramel as it's cooling. Cook's Illustrated has several mouth-watering suggestions: Orange-Espresso Caramel Sauce, Coconut Ginger Caramel Sauce, and Dark Rum Caramel Sauce, to name a few.
Some serving suggestions:
- I think that this recipe could translate really well into a finger-food, buffet-table item. My thought is to make the cheesecake as normal, but then cut out mini-cheesecakes (either in square or in circles using a biscuit cutter) that would be about an inch or so across--small enough to be eaten in one single bite. Then use a chopstick or other poking-device to dowel a little hole in the top of the cake. Fill the hole with caramel and top with one whole pecan or a fragment of graham cracker.
- Another serving option would be to make several mini-cakes in individually-portioned ramekins. This would be fun for a dinner party and would be a bit more elegant than cutting slices of cheesecake.
Ok, ok, enough jabbering. Here's the recipe itself:
-----
Pecan and Salt Caramel CheesecakeAdapted from Chow.comCrust:
1 1/4 c. graham cracker crumbs (5-6 graham cracker rectangles)
4 tbsp (1/2 stick) unsalted butter--at room temperature
3 tbsp granulated sugar
Cheesecake:
2 lbs (4 8-oz packages) cream cheese--at room temperature
1 c. granulated sugar
1 large egg yoke--at room temperature
3 whole eggs--at room temperature
1 tsp vanilla extract
Caramel Topping:
1 c. granulated sugar
4 tbsp (1/2 stick) unsalted butter--at room temperature
1/2 c. heavy cream--at room temperature
1 c. roughly chopped pecans
1 large pinch sea salt
To begin:
Place all ingredients (included refrigerated ingredients) on workspace. Allow refrigerated ingredients to come to room temperature. The butter should be soft and malleable. Eggs can also be placed in a bowl of hot water to bring them to room temperature.
Preheat oven to 350 degrees.
To make the crust:
To make graham cracker crumbs, break several squares of graham crackers into rough pieces in a bowl. Use the bottom of a cup or a pestle to grind the crackers into uniform-sized crumbs. This was one of the most satisfying parts of the process--I may start crumbling graham crackers for stress relief. Mix sugar into the crumbs. Mix in the butter with your hands, squeezing gobs of butter together with the crumbs with your fingers, until thoroughly combined. Press into the bottom of a 9- to 10-inch spring form pan. (If you don't have a spring form pan and want to make this cake in a regular pie dish, make sure to use a deep dish pan at least 2.5 inches deep. There's lots of toppings that go on this and the cheesecake with rise quite a bit in the oven!)
To make the cheesecake:
In the bowl of a stand mixer (or medium-sized bowl if using hand mixers), roughly combine sugar and cream cheese with a spoon. Once the sugar is adhered to the cream cheese, beat with a mixer until light and smooth--about the consistency of ganache frosting. Add the eggs one at a time, mixing until the egg is completely blended in (but be careful of over-mixing; the egg should just be barely blended so you can no longer see strings of the yellow yoke). Add vanilla extract and mix.
Pour mixture into the spring form pan on top of the graham cracker crust. Bake until a toothpick or a cake tester comes out clean and the center is set. The Chow.com instructions say this will take about 40 minutes, but mine ended up taking about 55 minutes, so just monitor your cake carefully. It will rise significantly in the pan and turn a deep golden color around the edges. It will also likely crack along the top--this is not so desirable in normal cheesecake, but fine for this one--just more nooks and crannies for the caramel!
Let the cheesecake cool completely on a cooling rack with the spring form still attached to the base. As it cools, the cheesecake will sink a bit into itself. Ultimately, the sides will be sloped slightly higher than the middle.
For the caramel:
Combine the sugar and 1 tablespoon of water in a small saucepan and stir until you make a thick sugar paste. Place over medium-high heat and bring to a boil. At this point, the Chow.com recipe says to allow the mixture to boil until it is amber in color. While this is true, I think it's a bit misleading about what you should expect. 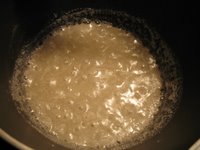
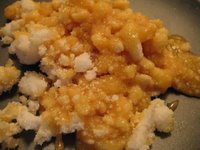
 In this first picture (left), the sugar/water paste has just come to a boil. It looks a bit shiny, but is still a grey color. This will boil furiously for a few minutes without changing color and the boiling will slowly begin to stop. In my first batch of caramel, I kinda panicked at this point and assumed that I had done something wrong since it wasn't changing colors. I stirred it a bit, and the mixture started to reform itself into granules of sugar (the middle image). I waited for a while longer and noticed that the sugar on the bottom was melting again, and the re-melted sugar was indeed turning an amber color. However, the sugar was really clumping together and looking more like rock candy than sauce, so I dumped it into a pan to cool (far right picture) and started over again.
My recommendation is DON'T STIR the mixture--a crust will form on the top and you'll see it pushing and dipping here and there as the sugar melts into a liquid again. Eventually (in about 5 minutes or so), the crust will melt as well and you can stir it a bit. I wasn't sure exactly what constituted an 'amber' color, so I erred on the side of caution and called it good when the sugar was about the color of browned butter.
Add the butter to the pan, and be careful because the mixture will pop and bubble and generally behave like a spoiled brat of a sauce. Stir until the butter is completely combined with the sugar. Remove from heat and add the cream in two batches. Again, the mixture will boil and bubble, toil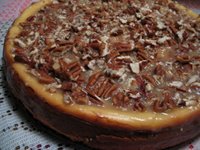 and trouble, for a bit. Keep stirring until everything is well combined and the caramel is a milky tan color. As you stir and the sauce cools, it will thicken slightly into a more familiar caramel consistency. The milk and butter also stabilizes the caramel, so it won't harden into rock-candy and will stay a thick syrup.
When the caramel has cooled to room temperature (you should be able to dip your finger in for a taste test), pour it over the cheese cake. Sprinkle a few pinches of sea salt over the top and then sprinkle on the pecans.
 Once the bottom of the pan is cool enough that you can touch it with your bare hands, cover and let the entire cake cool in the fridge. The longer it sits, the more the caramel will absorb into the nooks and crannies of the cheesecake. If you like this effect, let it sit for a few hours (for instance, while you're eating turkey n' stuffing). If you like your cake pristine and the layers separated, serve it a bit sooner.
 I had some leftover brisket wallowing in my fridge on last week and got it in my head to make some mini-calzones over the weekend. I thought I'd add some caramelized onions and roasted red peppers, but got stumped on the cheese. I stood in front of the cheese fridge at Trader Joe's for at least fifteen minutes picking up one cheese and then another, squinting my eyes and tasting various imaginary flavor combinations in my mouth. Goat cheese? No.... Sharp cheddar? Possibly... Maybe with some BBQ sauce? Sigh.... And then my hand wavered over some smoked gouda. I can't remember the last time I had gouda. No reason, really, I just...haven't.
 Cover each rolled-out circle as you finished with saran wrap or an upside down bowl to keep it from drying out while you finish the rest of the circles.
 Lift one side of the dough over onto itself and pinch the dough together in the middle. Pinch all the dough to one side closed and then go back and pinch the other side closed, forming a half-moon. I find it easiest to do this if I pick up the calzone and hold it upright in my left hand like a taco, and then I use the fingers of my right hand to pinch the rest of the dough closed. You can poke any errant bits of filling back inside. Repeat with remaining calzones. (Note--the parchment paper will continue sticking to the dough and that's fine! When the calzone bakes, the parchment will gradually un-stick itself.)
 Arrange as many calzones as will fit on a sheet pan. Just before baking, use a paring knife to cut three steam vents in the top of the calzone--go right through the parchment paper. Bake the calzones for five minutes and then flip them over. Bake for another 5 minutes and flip them over again. Bake for another 3-5 minutes until the calzones are golden and browned in spots. This whole baking process takes about 15 minutes in my oven, but it may take shorter or longer in yours. Since the filling is already cooked, you're really just looking for the crust to be a nice browned color. If the edges start to char, that's a sign that they're likely done cooking.